
|
Ozeki Camera Recorder
Product Guide
www.camera.ozeki.hu
|
Table of Contents
Quick start guide
This Quick Start Guide provides you instructions on how to setup your Ozeki Camera recorder software quickly. It will help you with the first steps to configure your camera and to setup a simple recording task. The guid uses a USB camera, the steps are similar for IP cameras as well.
Step 1 - Download Ozeki Camera Recorder
The latest release of Ozeki Camera Recorder can be downloaded from the following URL: www.camera.ozeki.hu/index.php?owpn=716. On this page, you need to click on the first link as Figure 1 shows below. We recommend you to always download the latest version. This version contains the latest bug fixes, security improvements and all the latest features.

Step 2 - Run the installer
After you extracted the .zip file, please open the newly created folder, and just like in Figure 2, just click on the executable file to start the installation process. (Note, that a more detailed installation is available at http://camera.ozeki.hu/index.php?owpn=1085.)

Step 3 - Click on next
As soon as you clicked on the .exe file, the installer starts with a welcome screen (Figure 3). All you have to do here is to click Next to continue the installation.

After the installation process is finished the Ozeki Camera Recorder service will start automatically in the background. To run Ozeki Camera Recorder on your web browser, just check Run Ozeki Camera Recorder as you can see it on Figure 4 and click Finish.

Step 4 - Click on the "Camera Recorder" desktop icon
The home page of Ozeki Camera Recorder is a desktop, where you can find the Camera Recorder application's icon as Figure 5 shows it. Click on the Icon to open the application.

Step 5 - Click "Create new camera", then select "USB camera"
To add new USB camera to the Camera Recorder select the Create new Camera button on the Camera Recorder control page and than select USB Camera from the Details as you can see on the Figure 6.

Step 6 - Select the camera device name
In the camera details page select the USB camera what you want to use and click on the OK button (Figure 7).

Step 7 - Create a new camera recording job
After you added a camera you can create various recording job. Select the Recording jobs menu and than click on the Create new Recording job button. From the recording job types select the Continous (Figure 8). Continuous recording job allows you to record your camera feed constantly.

Step 8 - Configure the camera recording job
In the Recording job details select the recorder camera device and specify the max length of the video files. Finally click on the OK button (Figure 9).

Step 9 - Play the recorded video
In the recordings menu you can see the completed video files. If you click on one of them you can play the video.

Ozeki Camera Recorder features
Camera connectivity features
- IP Camera connection: You can create an IP camera connection that manage data via a local computer network or the internet. These cameras are mostly used for surveillance.
- MJPEG Camera connection: This video format compresses each frame of the video as a JPEG image. These cameras handles video data using local network or the internet.
- Split camera: This function enables to create a grid of multiple cameras. You can set the resolution of the camera or the size of the grid depending on how many cameras you use.
- USB camera: You can connect an USB camera to Ozeki Camera Recorder. The camera needs to be attached to your computer but the image of the camera can be viewed from the local network or the internet.
- Detect available cameras: By using this feature, you can detect IP cameras in your local network and connect them instantly to the Camera Recorder.
Computer vision features
- Barcode detection: With this feature, you can read printed barcodes using your camera and decode the data contained in the barcode.
- Circle detection: By using this feature, your camera can detect circles on the recorded image and save the detected circles in a snapshot.
- Face detection: You can use your connected camera as a face detector with this connection. By setting size parameters, you can adjust the size of the area where a camera searches for faces.
- Line detection: This feature ensures the ability to detect lines with your camera. The connection saves a snapshot in case it detects as line in the image of the camera.
- Motion detection: The motion detection connection enables you to detect motions with your camera. You can set a threshold for the detection by adjusting the number of moving pixels that defines a motion.
Recording features
- Continuous recording: This recording feature allows you to record the image of the connected camera constantly if this option is set to enabled.
- Event driven recording: Event driven recording ensures that you can start a recording by triggering an event. This event can be a receiving of a text messages. You can also set the length of the recording in case of a event occurs.
- Manual recording: By using the Manual recording job, you can start and stop the recording manually by specifying text messages that start or stop the recording job.
- Periodic recording: Using Periodic recording feature, you can record footage from your connected camera for a specified time period.
- Set maximum length of recorded video: With this function, you can set a maximum length of your recorded video in all types of recording jobs. By setting this length, you can record only the important parts that you need.
Camera manipulation features
- Take snapshots: In all types of the connected cameras, you can take a snapshot of the camera image anytime if you want. This feature also allows you to set a periodic capture time that automatically takes a snapshot between the given time interval.
- Display overlay: This feature allows you to display the device name and date/time information on your camera stream.
- Transform camera image: The image of the camera can be transformed in multple ways. The transform can be the flip of the image (horizontally/vertically) or you can rotate the image by a certain angle as well.
- Logging camera events: This feature provides you the ability to log every event occured with your cameras and review them. This feature is really useful if a problem occurs with a camera or with its connection.
Messaging/reporting features
- Start and stop recording by text message: The recordings can be started or stopped by sending a text message. You can specify the messages when creating the recording job.
- Report finished recording: This function gives you the ability to send reports about the recording job when it is finished.
- Specify address for reports: This option provides you the opportunity to set an address for the recording job reports.
Video storing features
- Store all your recorded videos: Ozeki Camera Recorder stores all your recorded video files from every kind of recording jobs, and you can rewatch any of these videos.
- Filter videos by cameras: The list of the recorded videos can be filtered by which camera recorded the video.
- Write comments to your videos: This function allows you to write some comment to the recorded videos, so you can keep them well organized and alwys know that what is the content of the videos.
Cleanup features
- Periodic cleanup of recorded videos: To avoid running out of storage space, you can set a periodic cleanup for the recorded videos. This operation deletes all recorded footage from the Camera Recorder between a certain time interval.
- Set cleanup for each camera: This option gives you the ability to set a periodic cleanup time for the cameras itself. By doing this, you can clean the videos only from the selected cameras.
Ozeki Camera Recorder screenshots
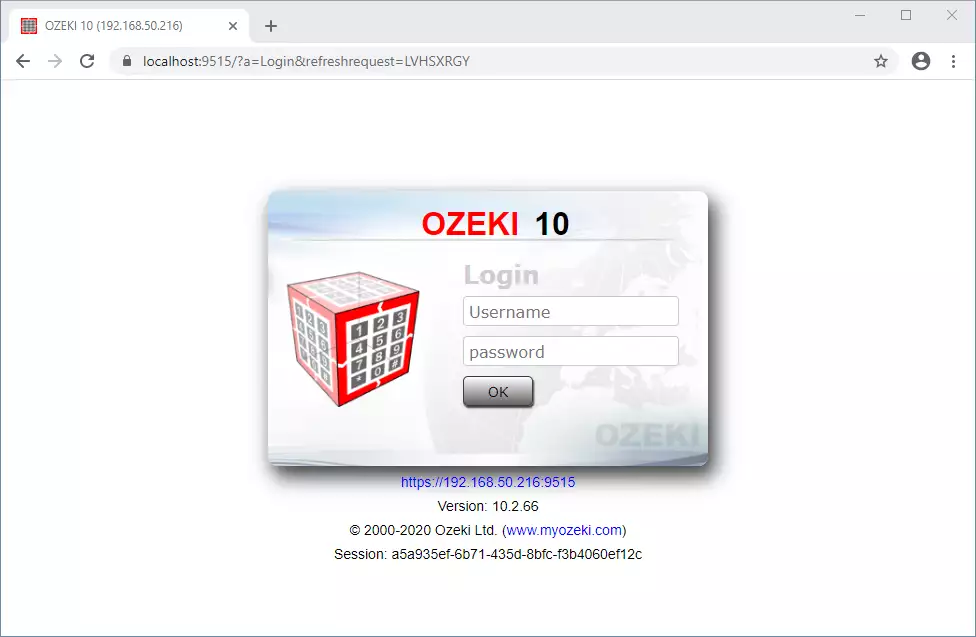
Figure 1 - Log in with your Ozeki account
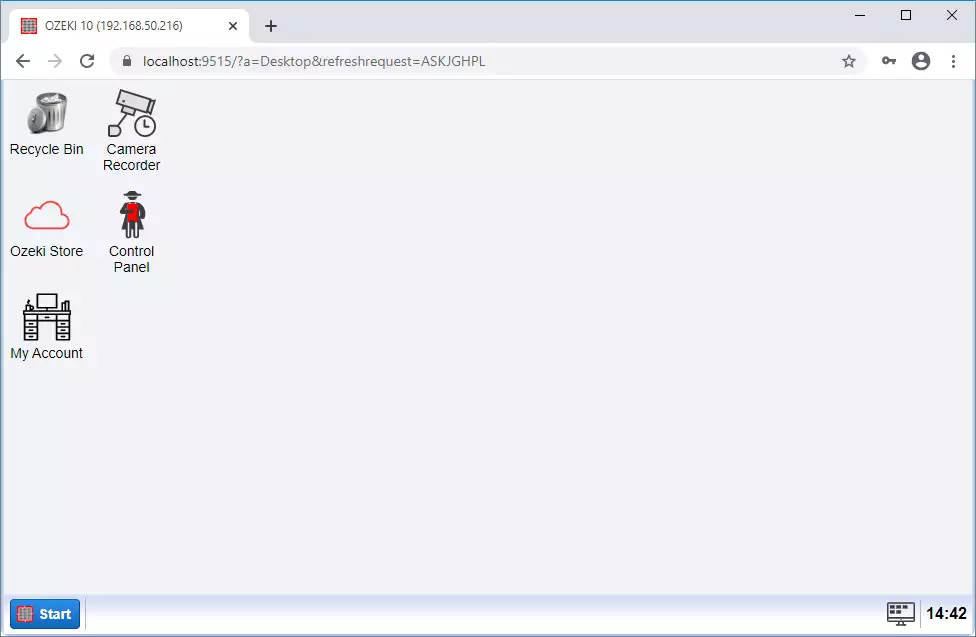
Figure 2 - Ozeki Camera Recorder desktop
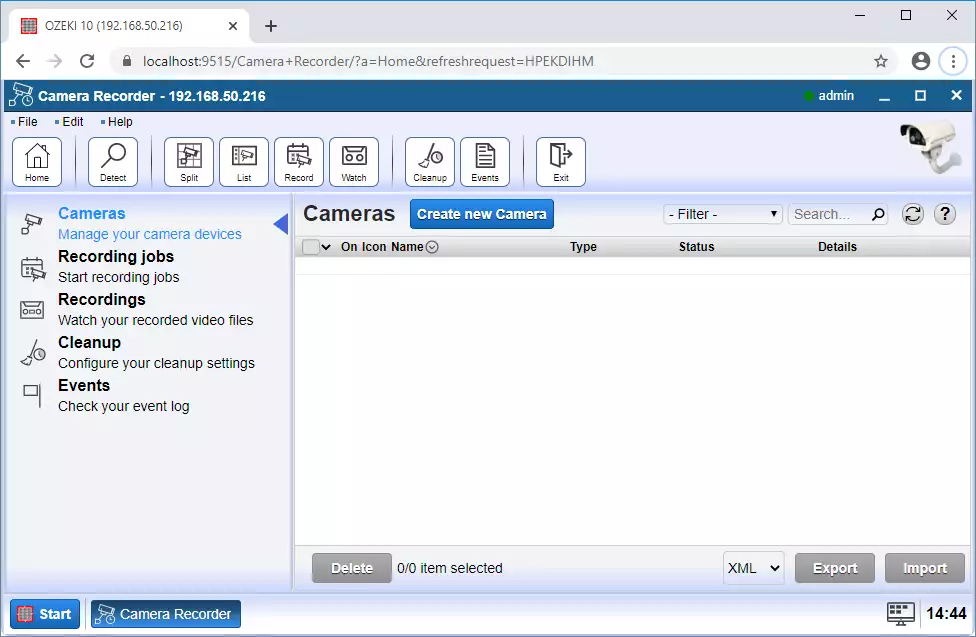
Figure 3 - Ozeki Camera Recorder main menu

Figure 4 - Create a camera connection
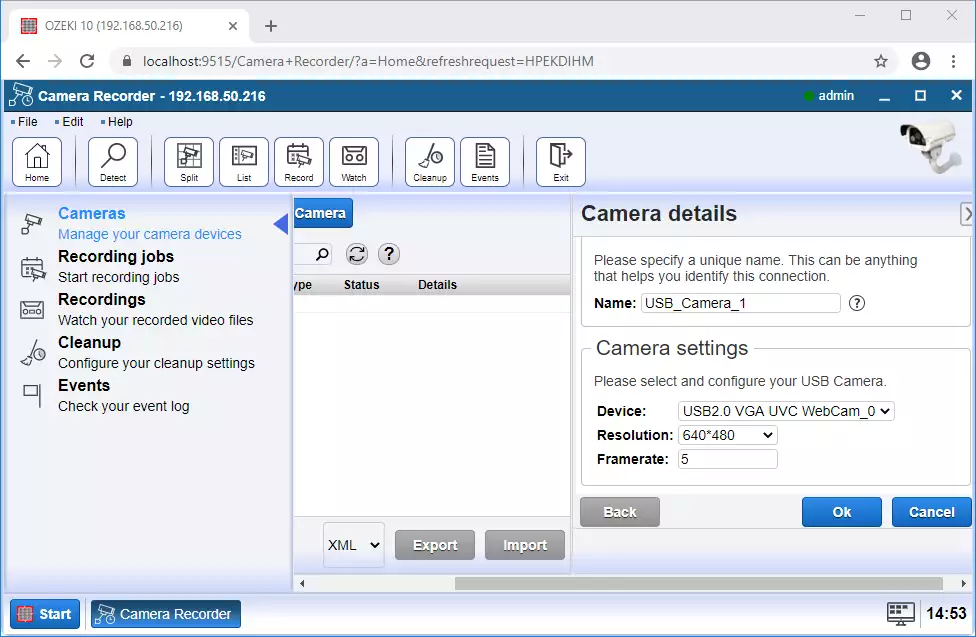
Figure 5 - USB camera connection details
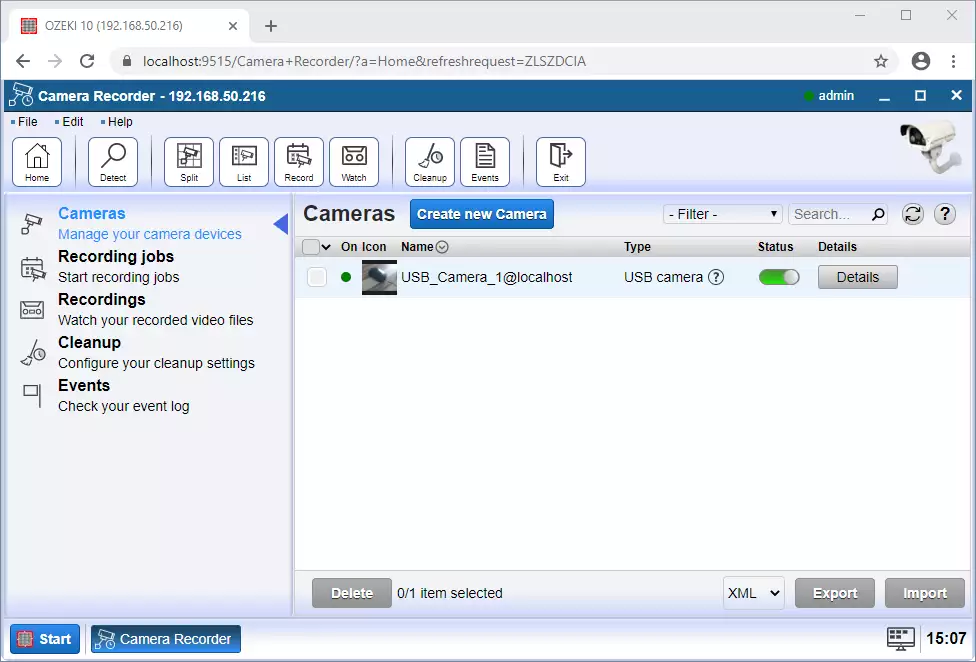
Figure 6 - List of camera connections
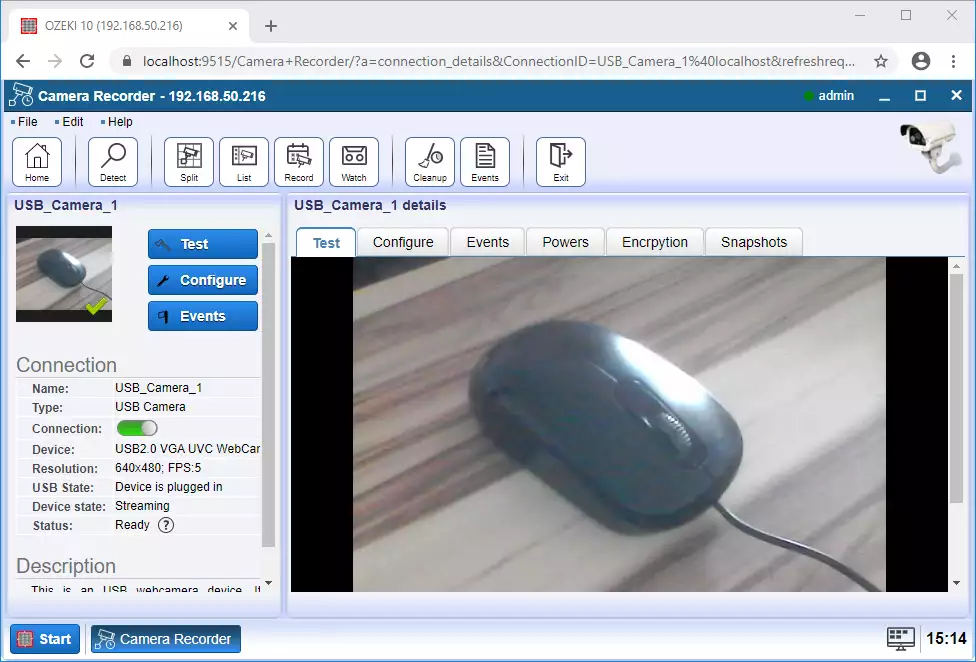
Figure 7 - Live video of the connected camera
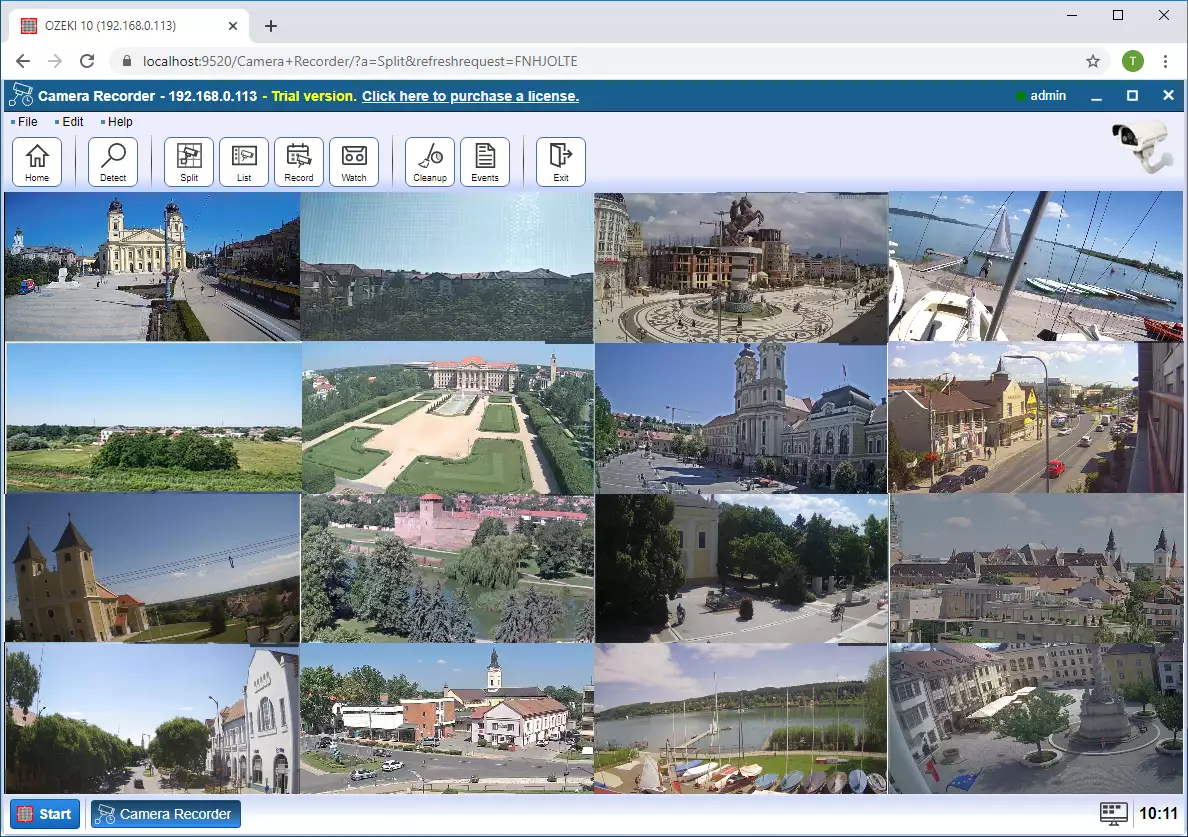
Figure 8 - Split view of 16 cameras
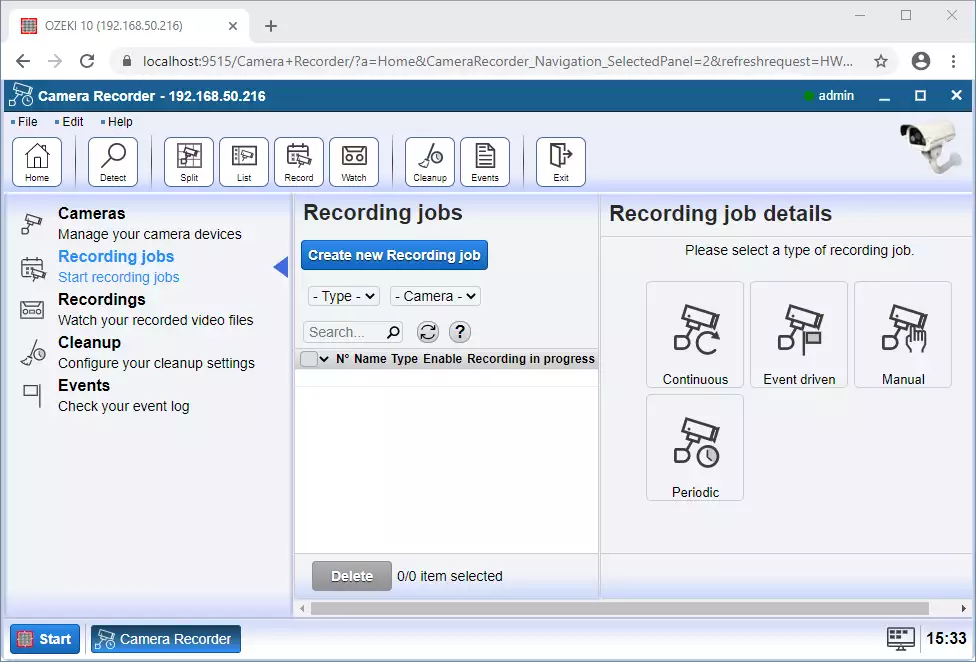
Figure 9 - Record the video of the connected camera
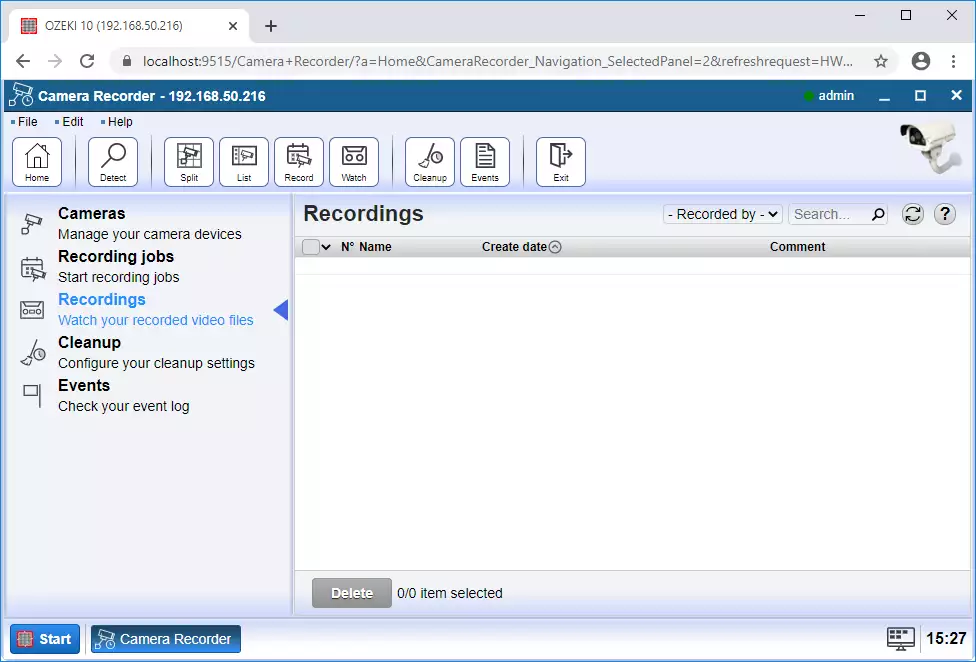
Figure 10 - List of recorded videos
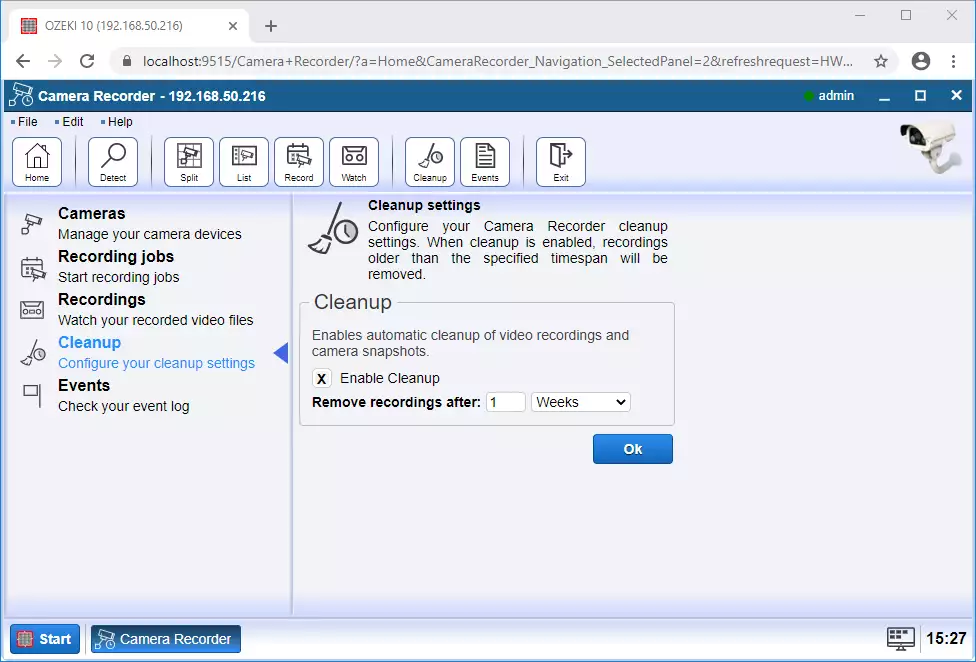
Figure 11 - Set a periodic cleanup for your videos
System Requirements
This guide outlines the hardware requirements of Ozeki Camera Recorder. You will first find the basic definitions and the recommended hardware configurations. You will find information about the supported operating systems, and the recommended hardware setup for you system.
Terms and definitions
Connection: A connection is typically defined as a link to the outside world. For example a link to a mobile network or a link to a database server would be a connection. Connections are able to receive and send messages. Hardware requirements depend on the number of connections you wish to setup.
Message throughput: The number of messages that travel through the system. It is measured in Messages per Second (MPS) or for lower capacity systems in terms of Messages per Minute (MPM). The message engine in Ozeki was designed to handle a maximum of 1000 messages per second on a single computer. Higher throughput can be achieved using multiple computers.
CPU: Bursts of high message throughput require higher single core performance. A high number of connections require higher number of thread processing capabilities. When choosing a CPU hierarchy for your system consider how you wish to use Ozeki. For best performance we recommend top of the line Multi core Intel CPU's. AMD CPUs are supported based on their equivalence to the suggested Intel CPUs.
Memory: For increased performance, Ozeki caches message queues in memory. Make sure to put as much RAM into your system as possible, since this will greatly improve your system's performance.
Network: Ozeki can operate on lower network speeds, but a 1Gb LAN network connectivity is recommended. Depending on the number of simultaneous connections and the message throughput the network bandwidth can be a limiting factor.
Supported operating systems
Ozeki 10 supports the following operating systems. All operating systems must be installed in their x64 version. 32-bit versions are not compatible with Ozeki. Full Windows and Linux updates are also mandatory to be applied to ensure compatibility with Ozeki.
Windows 11
Windows 10
Windows 7
Windows Server 2022
Windows Server 2019
Windows Server 2016
Ubuntu LTS 20.04
Raspbian Stretch
System sizes
Small system:
The maximum number of cameras is 2.
Medium system:
The maximum number of cameras is 5.
Large system:
The maximum number of cameras is 10.
Enterprise system:
The maximum number of cameras is 25 per PC.
Enterprise+ system:
The maximum number of cameras is 50 per PC.
Enterprise+ system:
The maximum number of cameras is 100 per PC.
Hardware variants
Ozeki supports and was tested on both bare metal systems and virtual machines. All systems (hardware CPUs and virtual CPUs) must offer the 64bit instruction set.
Supported virtual machine platforms:
VMware vSphere Hypervisor (ESXi) 6.X and above
Microsoft Hyper-V Server 2012 and above
Hyper-V on Windows Server 2012 and above
Citrix XenServer 8.0 and above
KVM 2.6 and up.
Ozeki system size
Small
Ozeki 10 |
Linux Debian-based |
Windows-based |
CPU Family |
Intel i3 (Gen.8) or equivalent |
|
vCPUs |
1 |
2 |
Memory |
1 |
2 |
Storage |
30 GB SSD based storage |
|
Medium
Ozeki 10 |
Linux Debian-based |
Windows-based |
CPU Family |
Intel i5 (Gen.8) or equivalent |
|
vCPUs |
4 |
6 |
Memory |
4 |
6 |
Storage |
100 GB SSD based storage |
|
Large
Ozeki 10 |
Linux Debian-based |
Windows-based |
CPU Family |
Intel i7 (Gen.8) or equivalent |
|
vCPUs |
6 |
8 |
Memory |
8 |
10 |
Storage |
300 GB SSD based storage |
|
Enterprise
Ozeki 10 |
Linux Debian-based |
Windows-based |
CPU Family |
Intel Xeon E5 v4 or equivalent |
|
vCPUs |
8 |
10 |
Memory |
16 |
18 |
Storage |
500 GB SSD based storage |
|
Enterprise +
Ozeki 10 |
Linux Debian-based |
Windows-based |
CPU Family |
Intel Xeon E7 v4 or equivalent |
|
vCPUs |
8+ |
10+ |
Memory |
32+ |
34+ |
Storage |
500+ GB SSD based storage |
|
ARM-Based
Raspberry Pi 3B+ (Debian9) |
Ozeki 10 |
|
Extensions |
up to 16 |
|
SIM Calls (SC) |
up to 8 |
|
SD Card |
minimum 32GB Class 10 Micro SD |
|
Required |
Heat sink housing and Raspberry Pi-compatible 2.5 Amp Micro USB power supply. |
|
Cloud Provider
Cloud Provider |
||||
Small (up to 10 ext) |
G1 Small |
B1ms |
a1.medium |
t2.small |
Medium (up to 50 ext) |
n1-standard-4 |
D4 v3 |
m5ad.xlarge |
t2.xlarge |
Large (up to 250 ext) |
n1-highmem-4 |
D12 v2 |
r5ad.xlarge |
t2.2xlarge |
System sizes
Small system:
The maximum number of cameras is 2.
Medium system:
The maximum number of cameras is 5.
Large system:
The maximum number of cameras is 10.
Enterprise system:
The maximum number of cameras is 25 per PC.
Enterprise+ system:
The maximum number of cameras is 50 per PC.
Enterprise+ system:
The maximum number of cameras is 100 per PC.
How to install Ozeki Camera Recorder
Step 1 - Download Ozeki Camera Recorder
The latest release of Ozeki Camera Recorder can be downloaded from the following Downloads page: http://camera.ozeki.hu/p_716-download-camera-recorder.html To download the installer in compressed format, you need to click on the first OzekiCameraRecorder_x.x.xx.zip link as Figure 1 shows below. We recommend you to always download the latest version. This version always contains all the currently available features and improvements.

Step 2 - Extract the downloaded file
When the download finished, you have to extract the compressed file to be able to run the installer of the software. For that, please open the Downloads folder on your computer. Then, as you can see it on Figure 2, right click on the file and select Extract All.... By doing this, you will get the executable installer of Ozeki Installer.

Step 3 - Run the installer
After you extracted the .zip file, please open the newly created folder, and just like in Figure 3, just click on the executable file to start the installation process.

Step 4 - Install Ozeki Camera Recorder
As soon as you clicked on the .exe file, the installer starts with a welcome screen (Figure 4). All you have to do here is to click Next to continue the installation.

To install Ozeki Camera Recorder on your computer, you must accept the terms of the License Agreement. Please review them then as Figure 5 demonstrates, click 'I Agree' button to continue.

After the installation process is finished the Ozeki Camera Recorder service will start automatically in the background. To run Ozeki Camera Recorder on your web browser, just check Run Ozeki Camera Recorder as you can see it on Figure 6 and click Finish.

Step 5 - Ozeki Camera Recorder desktop
The home page of Ozeki Camera Recorder is a desktop, where you can find the Camera Recorder application's icon as Figure 7 shows it. Click on the Icon to open the application.

Step 6 - Add new USB camera to Ozeki Camera Recorder
To add new USB camera to the Camera Recorder select the Create new Camera button on the Camera Recorder control page and than select USB Camera from the Details as you can see on the Figure 8.

Step 7 - Select USB device
In the camera details page select the USB camera what you want to use and click on the OK button (Figure 9).

Step 8 - Camera connection created
In the cameras list the new USB camera is appeared and you can see if the status is connected. If it is not connected click the switch. After it you can open the camera by click on the Details button as Figure 10 shows it.

Step 9 - Test USB Camera picture
As you can see on the Figure 11 the USB Camera's picture is shown in the Test tab.

How to set the admin password after installing Ozeki Installer, for remote access
This page explains to you, how you can change your admin password in Ozeki Installer. If you change your admin password, you can give permission to access your computer from a distance. By reading this step-by-step guide, you will be able to receive help from another Ozeki user, by allowing them to log in to your desktop from another computer. This will only take you about 5 minutes to read and to perform. This does not requier any skill from the user, because you can do it in the graphical user interface of the program. It is really simple and easy, so do not waste any time. Let's do it!
To be able to change the admin password for your Ozeki Installer on your computer, you need to open the desktop of the installer first. This way you will have access to the GUI of Ozeki

Step 1: Opening control panel
First of all ,you will need to click on the "Start Menu" button on the bottom-left corner of the screen. Here you will see five different options. You need to choose "Control Panel".

Step 2: Selecting the user
After getting into the control panel, you will see some connections . You need to choose the one with "Admin" written as its type, and click on the "Details" button.

Step 3: Entering the new password
Here you will see a password field. You need to type in your password of choice, and click the "OK" button.

Step 4: Success
After you clicked the OK button, a window will open up, saying " Configuration succesfully updated!"
Click the " OK " button to close the pop-up window. Now you have your admin password changed.

How to activate your license code
This page explains how you can activate your purchased license. To be able to use Ozeki with full functionality, you need to purchase a license, and you need to and activate it. During the purchase procedure you will receive a serial number from Ozeki in e-mail. Without activation, you can only use the software in trial mode for 7 days. (The trial mode does not require activation.)
What is product activation?
Product activation is a license verification process that some software programs requires. Product activation protects the software owner from unauthorized usage of the software. Product activation gives you access to the software.
What is serial number?
Serial number is a unique identifier that is assigned to an item. Serial number can contain letters and other typographic symbols, or it can consist entirely of strings. Serial number is what you get when you purchase a license for a product.
What is activation code?
Activation code is a code composed of letters and numbers often separated to segments with hyphens. Activation code is used to gain limitation free access to a software. You get unique activation code when you activate a license.
How to activate an Ozeki software product (Clear steps)
To activate an Ozeki software product:
- Launch Ozeki
- Select the My Account icon
- Click the green button labeled Add license code
- Login or Create your Ozeki account
- Use your Ozeki account to Sign in
- Enter your serial number to Activate product
- Continue if your product activation code has been accepted
- Check your activated license
Go to My account option
To start the activation procedure, click on the "My Account" icon. If you already have an existing user, log in Sign-In window. This allows you to check your licenses. (Figure 1)

Add your license code
If you can log in into your account, select the Licenses and Subscriptions panel, then click the green "Add license code" button. This allows you to use the verification credentials (you got them from Ozeki). (Figure 2)

Create a new Account
If you do not have an Ozeki account yet you have to click on "Create your Ozeki account" button in the Sign-In window.
This leads you to the registration form where you can register your account in order to verify your license.
(Highlighted in Figure 3)

Give new user credentials
In order to register a new user, you have to enter your Name, Email address, Password and Mobile number, then click on "OK". Make sure that your password is strong enough to register and do not forget that your email address will be your login name later. Your mobile number is important because if you forget your password you can recover it using your phone. (All highlighted in Figure 4)

Check the registration outcome
Your new Ozeki Account is created when the Create Account window says so. Your next step is to sign in with the Sign in... link below. (Figure 5)

Sign in
In the E-mail or phone textbox you have to give your e-mail address or your phone number to continue the login process. You can recover your forgot password here by clicking the Forgot password option. Signing in means you agree to Ozeki's Conditions of Use & Sale. (All highlighted in Figure 6)

Provide your serial number
On the next page you need to provide your serial number into the Serial No.: textbox then click on the "Activate" button. (Highlighted in Figure 7)

Make sure that the activation code is accepted
If you have provided your serial number correctly you will see that your activation code has been accepted and you can use the
full version of the product without limitations. By clicking the Continue button you can finish the activation procedure.
(Highlighted in Figure 8)

Check your licenses
In the Home page, by selecting the Licenses and Subscriptions panel, you can see your License codes. You can check the serial number, the date until the license is valid and other details by clicking the Details button. (Figure 9)

To sum it up
Now, you can pause and catch your breath. By following the above directions you can create the solution quickly. Now you can use the activation to get access to the product you purchased. You have seen how simple it is. If you have already completed the steps I am sure, if you let your boss know, you will be rewarded. If you would like to receive more valuable information about the advantages of other smiliar solutions, please open ozeki-sms-gateway.com. I hope this document will be useful to all the readers and especially to beginners.
Recording options
Check out all the great recording options that Ozeki Camera Recorder ensures. This page is an overview of the recording options available in Camera Recorder. You can read a short introduction about the recording solution to get an idea about the recording option, and if you like the solution, you can just go ahead to the guide that explains how you can configure your system to get that recording solution.

If you want to record everything captured by your camera, continuous recording job is the solution that you are looking for. Continuous recording provides a constant recording of the footage when the recording is enabled. You can set a maximum length for the recorded video and also ask for a report message when the recording finished. You can also rewatch or download the recorded video from Camera Recorder.
Learn More

The scheduled camera recording job is a great solution in case you know what is the time interval, that you want to record with your camera. This recording solution ensures the ability to setup an exact time interval, that defines when the recording will start and when it will stop.
Learn More

Event driven recording job is the solution that you are looking for if you would like to record the image of your camera only in case of a specific event occurs. With this solution, you can set the event that will trigger the recording and also you can define the length of the recording after the event triggered the recording.
Learn More

With a manual recording job you have the ability to start and stop the recording by sending a simple text message to the connected camera connection. These controlling messages can be defined during the configuration of the manual recording job.
Learn More
Camera Recorder provides you the ability to take a snapshot of the camera image anytime you want. This can be done by just clicking on a button or you can also setup a periodic time to take snapshots automatically. All your snapshots can be previewed and downloaded from Camera Recorder.
Learn More
Continuous camera recording jobs
This guide provides you some information about how you can create a continuous camera recording job in Ozeki Camera Recorder. This type of recording job records the image of the selected video continuously when the recording is enabled. You can also set the length of the recorded video.
Step 1 - Create a new continuous recording job
You can create a continuous recording job with a connected camera. In Ozeki Camera Recorder, select the Recording jobs menu and then click on the Create new Recording job button. From the list of recording job types select the Continous (Figure 1). Continuous recording job allows you to record your camera feed constantly.

Step 2 - Configure the camera
In the Details menu of the Continuous recording job, you need to select the camera which will record the footage. Here, in this menu, you can also set a maximum length for the recorded video (Figure 2). After you set everything you needed, just click on OK to create the recording job.

Step 3 - Play the recorded video
After the recording of the video finished, you can rewatch the recorded footage in the Recordings menu. Here, you can see all your recorded videos in a list (Figure 3). By clicking on a video, you can watch the video or write a little comment on it.

Scheduled camera recording jobs
The following document is about to show you how you can create a scheduled camera recording job in Ozeki Camera Recorder. The scheduled camera recording job is capable of record the image of the camera in a specified period. For example, you can set a recording every Thursday from 13:00 to 17:30 with this recording job.
Step 1 - Create new scheduled recording job
To create a scheduled recording job, you need to select the Recording jobs menu in Camera Recorder. Here, you have to click on the Create new Recording job button. Finally, from the list of available recording jobs, now you need to select Periodic as Figure 1 shows below.

Step 2 - Configure scheduled camera recording job
In the configuration menu, first, you need to select the camera that you wish to record. Then, you can specify the time interval of the recording by adjusting the time interval. Here, you can set a recording for a given day of the week or the month (Figure 2). Lastly, just click on OK to create the scheduled recording job.

Step 3 - Play recorded video
After the recording of the video finished, you can rewatch the recorded footage in the Recordings menu. Here, you can see all your recorded videos in a list (Figure 3). By clicking on a video, you can watch the video or write a little comment on it.

Event driven recording jobs
Ozeki Camera Recorder provides you the ability to record footage in case an event occurs. This guide demonstrates how you can create an event driven camera recording job. This type of recording is useful when you want to record the video footage when a specified event triggered the recording.
Step 1 - Create a new event driven recording job
An event driven camera recording job can be created easily in Ozeki Camera Recorder. To do this, just select Recording jobs from the side menu, and here, click on Create new Recording job. Then, from the list of available recording jobs, just click on Event driven, as Figure 1 demonstrates it.
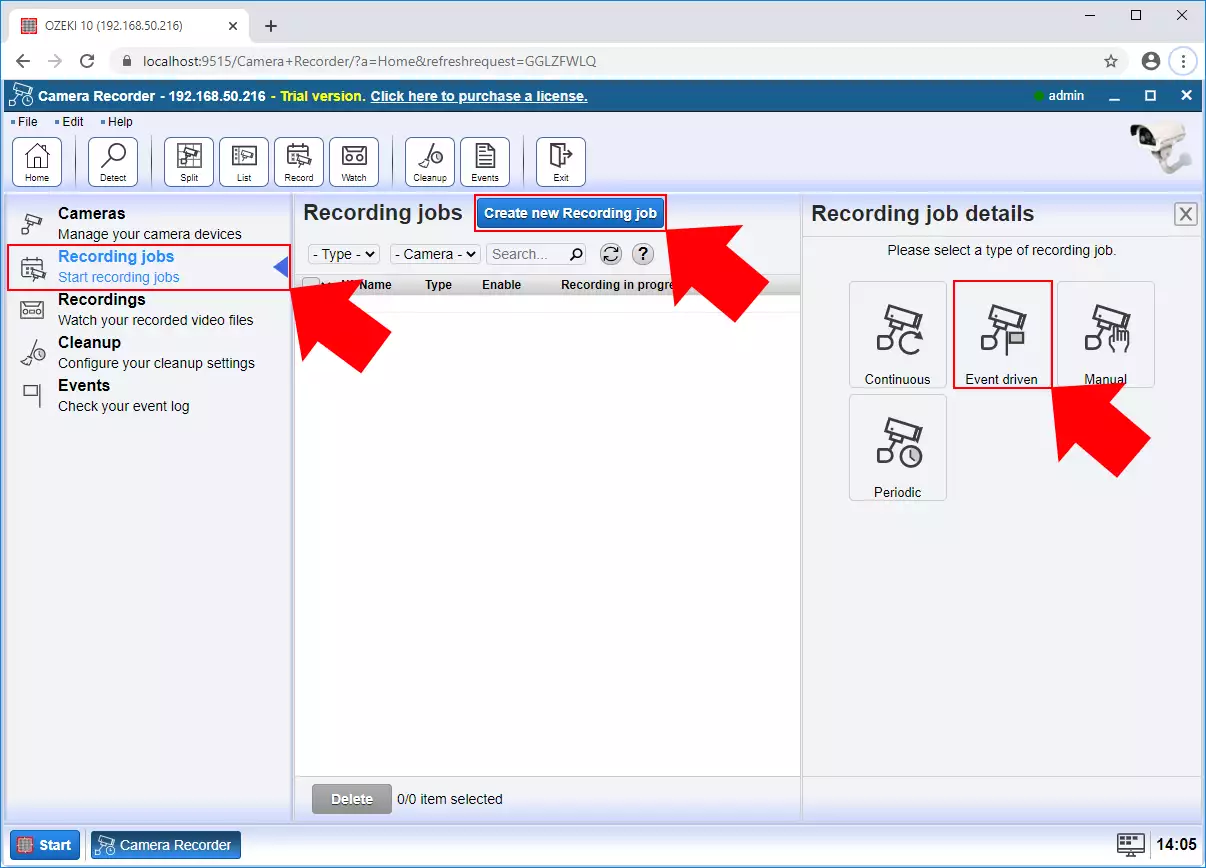
Figure 1 - New event driven camera recording job
Step 2 - Configure the event
When configuring the event driven recording job, first, you need to select the camera which will to the recording job. Then, you can set a text message as an event, that will trigger the recording. In the next section, you can set the length of the video after the event triggered (Figure 2). Lastly, you just need to click on OK to create the event driven recording job.
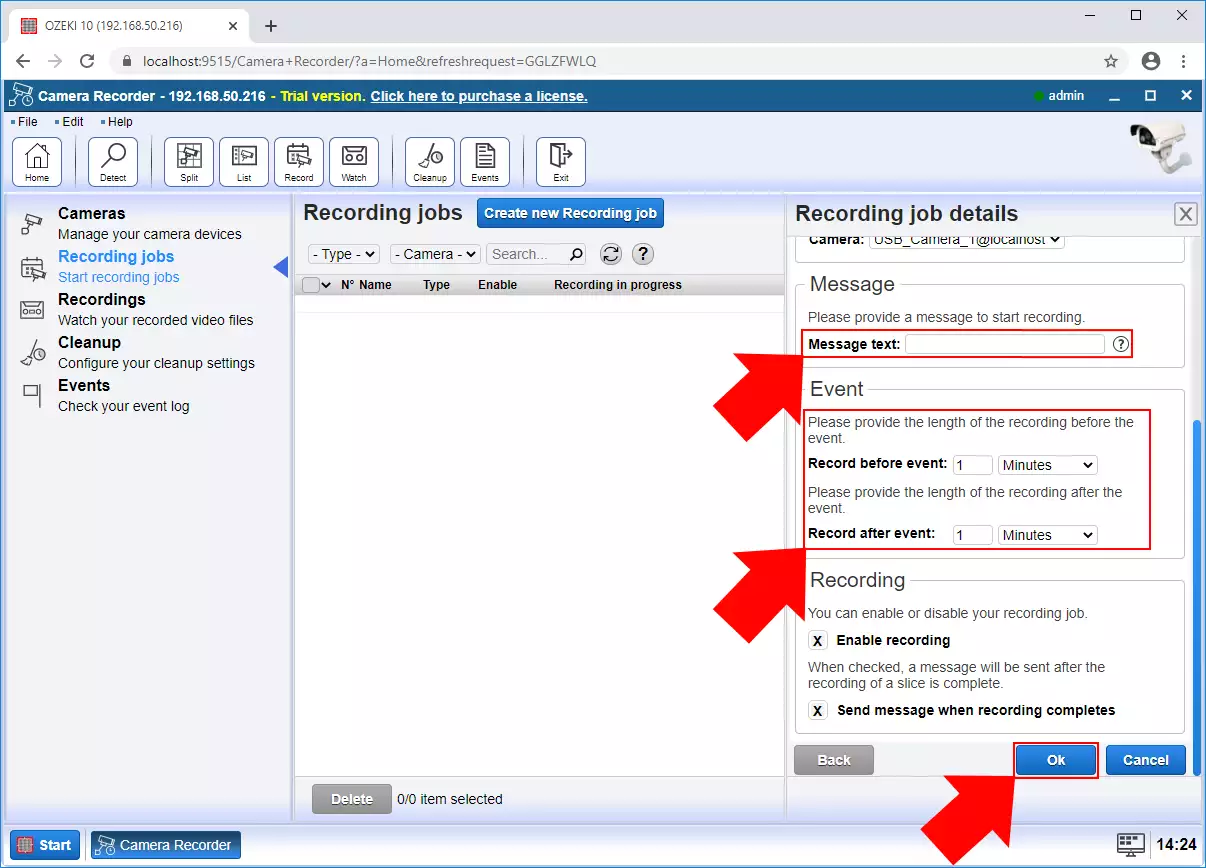
Figure 2 - Configure event camera recording job
Step 3 - Play the recorded video
After the recording of the video finished, you can rewatch the recorded footage in the Recordings menu. Here, you can see all your recorded videos in a list (Figure 3). By clicking on a video, you can watch the video or write a little comment on it.
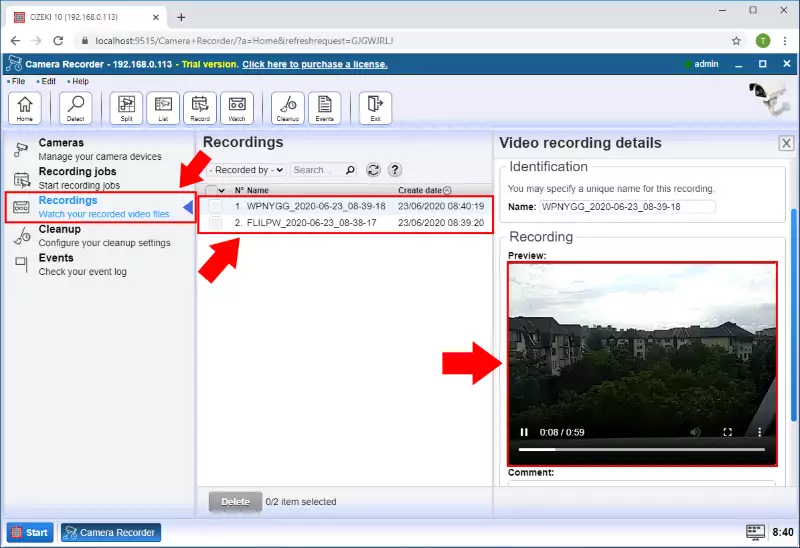
Figure 3 - Play recorded video
Manual camera recording jobs
This little guide is about to provide some useful information about how you can create a manual recording job in Ozeki Camera Recorder. This type of recording job allows you to start and stop the recording by a simple text message.
Step 1 - Create a new manual recording job
The manual camera recording job can be created easily in Ozeki Camera Recorder. To do this, just click on Recording jobs from the side menu, and here, click on Create new Recording job. Then, from the list of available recording jobs, just select on Event driven, as you can see it in Figure 1.

Step 2 - Configure the camera
In the next step, you need to configure your manual recording job. Here, you can select a camera for the recording job. Then, you need to specify a starting and finishing message (Figure 2) that will start and stop the recording job. Finally, just click on OK to create the manual recording job.

Step 3 - Play the recorded video
After the recording of the video finished, you can rewatch the recorded footage in the Recordings menu. Here, you can see all your recorded videos in a list (Figure 3). By clicking on a video, you can watch the video or write a little comment on it.

How to take camera snapshots
This simple guide is about to show you how to take snapshots from your camera in Camera Recorder. The snapshots can be taken manually or you can also set a time interval when the system automatically takes a snapshot and stores it for you. The snapshots are always available for you to preview or download them.
Step 1 - Open your camera connection
The first step of taking a snapshot is to open a camera connection that you would like to take a picture from. This can be done easily by selecting the Cameras menu in the Camera Recorder and here, as Figure 1 shows it, just click on the camera connection from the list of available connections.

Step 2 - Take immediate snapshot from the camera
In the menu of the camera connection, the main window shows the image of the camera. Here, you can easily monitor, what your camera sees. To capture a moment that you would like to store as an image, just click on the Take snapshot button below as you can see it in Figure 2.

Step 3 - Set periodic snapshot capturing
Camera Recorder also ensures the ability to take periodic snapshots of your camera. To be able to do this, just select the Configure tab in your camera connection, and here, click on the Advanced tab. As Figure 3 demonstrates it, in the Snapshot menu, you can enable the periodic capture and also set a time interval in seconds between the frame captures.

Step 4 - Watch all taken snapshots
Every snapshot that you captured from your camera can be viewed in the Snapshots tab (Figure 4). Here, you can see the list of the snapshots, with their name and a timestamp of the creation time. To preview a snapshot, just point to the eye icon with your mouse, and a little picture box is going to appear with the snapshot. You can simply download a snapshot by just clicking on the name of the snapshot that you would like to download.

Computer vision
Check out some of the great computer vision configurations you can setup with your cameras. This page is an overview of the most popular setups. You can read a short introduction to the solutions to get an idea of what it does. If you like the solution, you can jump to the guide that explains how to configure your system to get a similar setup.
Find information about how you can use your camera as a motion detector and send alert messages in case it senses motion. By setting up en e-mail connection in Ozeki, you will be able to forward an alert e-mail message from the motion detector camera to that e-mail connection if the camera detected some motion.
Learn More
Learn about how you can use your connected camera to detect motions and send SMS alerts in case a motion triggers the camera. You can set up an SMS connection in Ozeki which can receive the alerts in case the connected camera detects a motion. Let's get started.
Learn More
Your camera that is connected to Ozeki Camera Recorder can be used as a motion detector camera. The motion detector camera can send alert messages as an HTTP request in case it detects motion. The HTTP client can be created in Ozeki and it will forward the detection alert message using HTTP request.
Learn More
In Ozeki Camera Recorder, you can use your camera to scan barcodes and read the data that the barcode contains. The detected and scanned barcode and the information from it can be sent by e-mail. For that, you need to set up an e-mail connection in Ozeki which will receive the data from the barcode scanner.
Learn More
The camera which is connected to Ozeki Camera Recorder can be used to scan barcodes and get the data from the barcode. Camera Recorder also provides the opportunity to send the data stored in the barcode via an SMS message. To do that, you need an SMS connection, that can be easily created in Ozeki.
Learn More
Ozeki Camera Recorder ensures the ability to send the data from the scanned barcode using HTTP. For that, you just need a camera and connect it to Camera Recorder as a barcode scanner, and an HTTP client which can be also created in Ozeki quite easily as well.
Learn More
How to send email alert when motion detected
The following guide is about to show how you can establish a motion detection connection in Camera Recorder and send alerts via e-mail when it detects motion. The guide provides a step by step guide which shows how you can create an e-mail connection which will forward the alerts to the e-mail account and how to create the motion detection connection itself.
Step 1 - Open Control Panel
The first step of the guide is to open the Control Panel application from the Ozeki desktop, where you can create various connection types to connect different applications and devices (Figure 1).

Step 2 - Create new connection
In the Control Panel application, now we want to connect to an email server, so to be able to do that, just click on the Create new Connection button and then select Messaging from the list of connection methods (Figure 2).

Here, in the Messaging menu, to create an e-mail connection, you need to select the E-mail type connection by clicking on its icon as you can see on the Figure 3.

You can connect different email servers such as SMTP, POP3 or directly to the Gmail solution. Now we use an SMTP server so select the SMTP type as Figure 4 shows.

Step 4 - Specify connection details
In the Connection Details menu, specify the connection's name and then provide the sender address for the connection. After that, enter the SMTP server information such as hostname, port, authentication type, username, and password (Figure 5).

Step 5 - Open Camera Recorder
After you have the email connection to send emails, you need a motion detector. To create a motion detector open the Camera Recorder app from the desktop as you can see on Figure 6.

Step 6 - Create new Vision connection
In the Camera Recorder application's home page just click on the "Create new camera" button and then from the list, select the Vision type as Figure 7 demonstrates it.

From the Vision type connections select the Motion connection to create a Motion detector (Figure 8).

Step 7 - Specify motion connection details
In the Camera Details menu, select the camera device you want to use and in the Alert section check the "Send alert message" box. In the To connection section, select the email connection what you created before and enter the To Address what is the email address where you want to send the message. In the message box enter the message you want to send if the motion is detected. Finally, if you want to send the detected frame check the "Include snapshot as attachment" box and click on the OK button (Figure 9).

Step 8 - Motion detector created
After the creation, you will be able to see that the motion detector is created (Figure 10).

Step 9 - Email received
Now if motion is detected on the camera, the detector will send you an email to the specified email address where the given frame is attached as you can see on Figure 11.

How to send sms alert when motion detected
The next document gives you a brief introduction to how you can send alert SMS messages from your motion detection connection. This page contains a step by step guide which first, shows how you can connect to an SMS modem using an SMS connection. Then it demonstrates how to use your camera as a motion detector and send alert to the SMS connection when it detects motion.
Step 1 - Open Control Panel
The first step of this guide is to open the Control Panel application, where you can create various connection types to connect different applications and devices (Figure 1).

Step 2 - Create new connection
To create an SMS modem connection in Control Panel, you need to click on the Create new Connection button and then select the Messaging option (Figure 2).

Under the Messaging select the SMS type connection as you can see in Figure 3.

You can connect different SMS connections such as CIMD2, SMPP, or UCP but now we use the SMS modem so select the SMS modem type as Figure 4 shows.

Step 4 - Connect to GSM modem
In the Connection details menu, you need to select the port, where you connected the modem. For that, just click on the Autodetect button as you can see in Figure 5.

This Autodetect option will detect your modem, and if it is connected right the following window should show up like in Figure 6.

Step 5 - Enable GSM modem
To handle SMS messages with this connection, first, you need to enable the connection (Figure 7) by turning on the switch button in the connection details window.

Step 6 - Open Camera Recorder
After you have the SMS Modem connection to send SMS, you need a motion detector. To create a motion detector open the Camera Recorder app from the desktop as you can see on the Figure 8.

Step 7 - Create new Vision connection
In the Camera Recorder application's home page click on the "Create new camera" button and select the Vision type (Figure 9).

From the Vision type connections select the Motion connection to create a Motion detector (Figure 8).

Step 8 - Specify motion connection details
In the Camera Details menu, select the camera device you want to use and in the Alert section, check the "Send alert message" box. In the To connection section select the SMS modem connection that you created before and then, enter to the To Address field, what is the phone number where you want to send the message. In the message box enter the message you want to send if the motion is detected. Finally, click on the OK button (Figure 11).

Step 9 - Motion detector created
After that, you can see motion detector is created as Figure 12 shows.

Step 10 - SMS received
Now if motion is detected on the camera, the detector will send you an SMS to the specified phone number as you can see in Figure 13.

How to send HTTP request when motion detected
The guide on this page is about to give you some basic information about how you can use your camera as a motion detector and create HTTP requests when it detects motion. The page provides a step by step guide, which shows the way how you can create an HTPP client, write a PH script that can handle the HTTP request and create a motion detector using your camera. So, let's get started right now.
Step 1 - Open Control Panel
The first step of the guide is to open the Control Panel application from the Ozeki desktop, where you can create various connection types to connect different applications and devices (Figure 1).

Step 2 - Create new connection
To create an HTTP client connection in Control Panel, you need to click on the Create new Connection button and then select the Application option (Figure 2).

Here, in the Application menu, to create an HTTP client connection, you need to select the icon of the HTTP client by clicking on its icon as you can see in Figure 3.

Before creating the HTTP client connection, you need to specify some details. For that, select the HTTP tab, and here, first, check the Enable SMS forwarding option. Then, enter the HTTP URL below as you can see it in Figure 4. This URL will call the incoming.php PHP script and send the message via the 'msgdata' parameter.

Step 3 - HTTP connection created
After you created the HTTP client connection, you will be able to see it in the list of connections in Control Panel application as Figure 5 demonstrates it.

Step 4 - Example PHP code
Next, you need to write a simple PHP script, that can handle the alert message from the HTTP request. Figure 6 shows a great example, that will store the message into a variable and then, it opens the 'motiondetect.txt' text file and appends the alert message into that file.

Step 5 - Open Camera Recorder
After you successfully created the HTTP client connection and the PHP script to send and handle HTTP requests, you need a motion detector. To create a motion detector open the Camera Recorder app from the desktop as you can see in Figure 7.

Step 6 - Create new camera connection
In the Camera Recorder application, to create the motion detection connection, first, click on Create new Camera, and from the available options, select the Vision as Figure 8 demonstrates it.

Step 7 - Create motion detector
From the Vision type connections select the Motion connection to create a Motion detector (Figure 9).

Step 8 - Motion detector details
In the Camera Details menu, select the camera device you want to use and in the Alert section, check the "Send alert message" box. In the To connection section select the HTTP SMS client connection that you created before and then to the To address field, enter 'http request' that will ensure that the motion detector will trigger the HTTP client connection to establish an HTTP request. In the message box enter the message you want to send if the motion is detected. Finally, click on the OK button (Figure 10).

Step 9 - Motion detector created
After you finished with that, you can see the motion detector is created as Figure 11 shows.

Step 10 - Motion detected
To test your motion detector camera, just make some movement in front of your camera, and if you have done everything right to this point, the detector created some HTTP requests. To check that, just open the 'motiondetect.txt' file (Figure 12), and if your motion detector works well, you will be able to see the alert messages in the text file.

How to send email when barcode detected
Ozeki Camera Recorder provides you the feature to use your camera as a barcode scanner and send the detected barcode via an e-mail message by using an e-mail connection. The following document contains a step by step guide which shows how you can create an e-mail connection to receive the detected barcodes and how you need to configure the barcode scanner to send the detected barcodes as an e-mail message.
Step 1 - Open Control Panel
In the first step, you need to open the Control Panel. You can do this by opening Ozeki in your web browser, and on the Desktop, click on the icon of the Control Panel as you can see it in Figure 1.

Step 2 - Create new connection
In the Control Panel application, you need to create an SMTP connection to handle the e-mail messages from the motion detector. To do that, first, click on the Create new Connection, and here, you need to select the Messaging option as Figure 2 shows it below.

Next, you will be able to see all the messaging connections that you can create in Ozeki. To follow this guide, now you need to create an e-mail connection, so at this point, just click on E-mail like in Figure 3.

The next menu shows the available e-mail connections for you. Here you can create a POP3 client or a Gmail connection, but this guide requires an SMTP connection. So, now just click on the SMTP icon (Figure 4).

Step 3 - Specify connection details
Before creating the SMTP connection, you have to specify some details in the Configuration menu. First, you need to type a name for the connection. Then, you need to provide details about the sender as you can see it in Figure 5. These details will be used when sending the e-mail. Lastly, you need to specify the details of the SMTP server, that the connection is going to connect. If you entered all details, you can just click on OK.

Step 4 - Open Camera Recorder
After you created the e-mail connection, now you need to establish the barcode scanner connection. To do that, just navigate back to the Ozeki Desktop, and here, just select the Camera Recorder application (Figure 6).

Step 5 - Create new camera connection
In the Camera Recorder application, to create the barcode scanner, first click on Create new Camera, and from the available options, select the Vision as Figure 7 demonstrates it.

Step 6 - Create new barcode scanner
The Vision menu contains all the computer vision connections, that you can create in Camera Recorder. Now, this guide requires you to create a barcode scanner, so at this point, you have to click on Barcode (Figure 8).

Step 7 - Configure barcode scanner
Next, you need to define the details for the barcode scanner. First, you need to select the camera, that you would like to use as a barcode scanner. Then, check the Send alert message option, and select the e-mail connection that you created before. At this point, you need to type the e-mail address where you want to send the alert and type the message itself. Lastly, check the option that ensures that the barcode will be sent as well, as an attachment (Figure 9). Finally, just click on OK.

Step 8 - Barcode scanner created
Your barcode scanner is going to appear in the list of the camera connections. To be able to see that, just select the Cameras menu like in Figure 10.

Step 9 - Barcode detected
If you completed this guide successfully, the barcode scanner can detect barcodes, and send them to the selected e-mail address. Figure 11 demonstrates that, you can see how the e-mail looks like that just received from the barcode scanner connection.

How to send sms alert when barcode scanned
The next guide gives you an idea of how you can create a barcode scanner and send alerts via SMS message when it detects a barcode. The guide provides a step by step guide, which demonstrates the way how you will be able to create an SMS connection, a barcode scanner connection and how you can connect them to each other to send the barcode alerts via SMS message.
Step 1 - Open Control Panel
In the first step of this guide, you need to open the Control Panel. You can do this by opening Ozeki in your web browser, and on the Desktop, click on the icon of the Control Panel as you can see it in Figure 1.

Step 2 - Create new connection
In the Control Panel application, you need to create an SMS modem connection to be able to send the alert messages from the barcode scanner. To do that, first, click on the Create new Connection, and here, you need to select the Messaging option as Figure 2 shows it below.

Next, you will be able to see all the messaging connections that you can establish in Ozeki. To follow the guidelines of this page, now you need to create an SMS modem connection, so at this point, just click on SMS like in Figure 3.

The next menu shows the available SMS connections for you. Here you can create a CIMD2, SMPP client, or an HTTP server. But this guide requires an SMS modem connection, so just click on the SMTP icon (Figure 4).

Step 4 - Connect to GSM modem
Before creating the SMS modem connection, you need to provide some details in the Connection details menu. First, you need to give a name to the connection, then select the port, where you connected the SMS modem to. As Figure 5 shows that, you can select the Autodetect option, which will automatically detect which port your SMS modem is connected to.

After selecting the Autodetect option, the following window pops up like in Figure 6. This window shows all information about the connected SMS modem. If your SMS modem detected successfully, you can just click on OK to create the SMS modem connection.

Step 5 - Enable GSM modem
The created SMS modem connection will show up in the list of available connections in Control Panel. By default, the connection is disabled, so to activate it, just click on the Status bar as you can see it in Figure 7, and is the status turns green, that means the SMS modem is now enabled and ready to use.

Step 6 - Open Camera Recorder
After you created the SMS modem connection, you need to establish the barcode scanner connection. To do that, just navigate back to the Ozeki Desktop, and here, just select the Camera Recorder application (Figure 8).

Step 7 - Create new Vision connection
In the Camera Recorder application, to create the barcode scanner, first click on Create new Camera, and from the available options, select the Vision as Figure 9 demonstrates it.

The Vision menu contains all the computer vision connections, that you can create in Camera Recorder. Now, this guide requires you to create a barcode scanner, so at this point, you have to click on Barcode (Figure 10).

Step 8 - Specify barcode connection details
Next, you need to define the details for the barcode scanner. First, you need to select the camera, that you would like to use as a barcode scanner. Then, check the Send alert message option, and select the SMS modem connection that you created before. At this point, you need to type the phone number where you want to send the alert and type the message itself. Lastly, check the option that ensures that the barcode will be sent as well, as an attachment (Figure 11). Finally, just click on OK.

Step 9 - Barcode scanner created
After you created the barcode scanner, it will show up in the list of the camera connections. To check that, just select the Cameras menu and you will be able to see the created barcode scanner like in Figure 12.

Step 10 - SMS received
At the end of the guide, now you can test your solution. To test the barcode scanner, just show a barcode in front of the connected camera, and if you have done everything correctly till this point, you will receive the message from the barcode scanner as you can see it in Figure 13.

How to send HTTP request when barcode scanned
The next simple guide is going to demonstrate how you can use a barcode scanner to send HTTP requests using an HTTP client. The page contains a step by step guide where you will be able to see, how to establish an HTTP client connection in Ozeki, and how you can make your camera a barcode scanner and send alert messages as HTTP requests.
Step 1 - Open Control Panel
In the first step of this guide, you need to open the Control Panel. You can do this by opening Ozeki in your web browser, and on the Desktop, click on the icon of the Control Panel as you can see it in Figure 1.

Step 2 - Create new connection
In the Control Panel application, you have to create an HTTP client connection to be able to send the alert messages via HTTP requests from the barcode scanner. To do that, first, click on the Create new Connection, and here, you need to select the Application option as Figure 2 shows it below.

Next, you will be able to see the available Application connections in Ozeki. Here, you need to select the HTTP client just like in Figure 3, so just click on the icon of that connection.

Before finalizing the HTTP client connection, you need to provide some details about what request will this connection send and what data the request will contain. First, you need to select the HTTP tab, and here, check the Enable SMS forwarding option. Then, you need to specify the request itself. Figure 4 shows a simple example of a request, which will send the message in the 'msgdata' parameter to the incoming.php script.

Step 3 - HTTP connection created
After you created the HTTP client connection, you will be able to see it in the list of available connections in the main menu of the Control Panel application as Figure 5 demonstrates it.

Step 4 - Example PHP code
Next, you need to write a simple PHP script, that can handle the alert message from the HTTP request. Figure 6 shows a great example, that will store the message into a variable and then, it opens the 'barcodescanned.txt' text file and appends the alert message into that file.

Step 5 - Open Camera Recorder
After you created the HTTP client connection and the PHP script, you need to establish the barcode scanner connection. To do that, just navigate back to the Ozeki Desktop, and here, just select the Camera Recorder application (Figure 7).

Step 6 - Create new camera connection
In the Camera Recorder application, to create the barcode scanner, first click on Create new Camera, and from the available options, select the Vision as Figure 8 demonstrates it.

Step 7 - Create barcode scanner
The Vision menu contains all the computer vision connections, that you can create in Camera Recorder. Now, this guide requires you to create a barcode scanner, so at this point, you have to click on Barcode (Figure 9).

Step 8 - Barcode scanner details
Next, you need to define the details for the barcode scanner. First, you need to select the camera, that you would like to use as a barcode scanner. Then, check the Send alert message option, and select the HTTP client connection that you created before. At this point, you need to type the phone number where you want to send the alert and type the message itself. Lastly, check the option that ensures that the barcode will be sent as well, as an attachment (Figure 10). Finally, just click on OK.

Step 9 - Barcode scanner created
After you created the barcode scanner, it will appear in the list of the camera connection in the Camera Recorder applications. You can check it by selecting the Cameras menu of the Camera Recorder like in Figure 11.

Step 10 - Barcode scanned
At this point, you can test your solution by scanning a barcode with your camera. If you have done successfully to this point, after you scanned a barcode, you will be able to see the alert message in the 'barcodescanned.txt' text file as you can see it in Figure 12.

Commercial information
Download Ozeki Camera recorderHow to buy
Price list
Support
Contact us
Ozeki Camera Recorder
How to buy |
 |
* We ship our products to all countries on all continents
SELECT A PRODUCT
|
Order Ozeki Camera Recorder now, and enjoy the benefits. Please select the option that best fits your needs and click on the
order link. If you have questions, please send an e-mail to info@ozeki.hu.
Our colleagues will do their best to answer whatever questions you have.
To start please select the item that best fits your needs from the table below, and click on the order link. |
| ||||||||||||||||||||||||
|
Ozeki Camera Recorder - Standard licenses
Ozeki Camera Recorder - Enterprise licenses
After having placed your order, you will receive an e-mail confirming your purchase. For software licenses, your license code will be included in the e-mail. The prices displayed on this webpage are for information purposes only. This is not an offer. Ozeki Ltd. reserves the right to change prices for Products offered at this website at any time, and does not provide price protection or refunds in the event of a price drop or promotional offerings. The prices displayed on this site do not include any applicable sales taxes, including VAT, GST/HST, QST and/or provincial retail sales tax (in effect on the day of purchase) or shipping and handling fees. | |||||||||||||||||||||||||

Technical support for Software license holders
This page gives you information about Ozeki technical support services. These services are available for our customers, who own a software license. On this page you can find information about the different levels of technical support and the included services, such as support tickets, chat sessions, live remote desktop sessions or scheduled phone calls and on-line video meetings. The services below are provided on-line through various communication channels, such as e/mail, ticket system, chat and remote desktop applications.
Comparison chart
In the following table you can compare the different support service levels. The most popular options are the Silver and Gold support packages. We encourage you to pick the service package that best fits your required level of support.
Service level
- Version updates
- Support tickets
Service level
- Version updates
- Priority support tickets
- Chat with technicians
- 1 live session / month
- 2 scheduled phone calls / month
Service level
- Version updates
- Priority support tickets
- Chat with technicians
- 5 live sessions / month
- 5 scheduled phone calls / month
Service level
- Version updates
- Priority support tickets
- Chat with technicians
- 20 live sessions / month
- 24/7 telephone service
Version updates
This service allows you to update your system to the latest version. Ozeki regularly releases new software versions for it's products. These new versions provide bug fixes, improvements and new features. Customers subscribed to the version update service, can update their installed products to the latest software version. For example if you are have installed Ozeki Software v10.1.1, you can update it to to v10.1.2 or to v10.2.2 or to v11.3.3 or to any new version.
Support tickets
The purpose of the technical support service is to answer technical questions you may have related to an Ozeki Software Product. You can ask technical questions by opening support tickets at https://myozeki.com. Support tickets will be answered if you have a technical support service subscription and if you have registered your purchased Ozeki product on the Myozeki.com website. Learn more about Ozeki product registration.
Support tickets are normally answered in the order they come in, however priority is given to perimum support service holders: for silver,gold and platinum subscriptions.
Chat with technicians
Premium support service holders (silver,gold and platinum subscribes) can contact Ozeki Engineers using chat. In the chat sessions our engineers will help you by providing you the information you have requested. They can help you with installing, upgrading and configuring your system, or if you experience problems, they can help you solve them. Chat session are very useful, because URL-s, documents, files can be shared between the participants.
Chat sessions take place using Ozeki Chat. To be able to access the chat console, you need to register an account at myozeki.com.
Information on how you can setup Ozeki Chat on your mobile(Android and Iphone), on your webbrowser or on your desktop can be found on the following URL-s:
How to use Ozeki Chat form an Iphone mobile
How to use Ozeki Chat form an Android mobile
How to use Ozeki Chat form a Webbrowser
How to use Ozeki Chat form a Windows desktop
One of the advantages of installing the Ozeki Chat App on your mobile is that you will get notifications about changes to your support ticket requests and you can easily get in touch with the support staff.
Live support sessions
Often it saves time to ask an engineer to login to your system remotely and work with you to get the results you need. If you wish to configure your system, solve problems, or you simply need training, you can schedule a live support session.
Live sessions can be conducted using interactive video conference / remote desktop applications, or by using AnyDesk, Teamviewer, Remote desktop, Cisco WebEx, MS teams, GoToMeeting or any other remote console application you prefer.
Scheduled phone calls
You can ask for a live video call using Zoom, MS Teems or any other video conferencing software or you can simply call us on a dedicated phone line to talk about any issue or solution you wish to discuss related to our products or services.
Managed hosting service
Ozeki license holders may subscribe for the Ozeki Managed Hosting service as well. In the frames of this service Ozeki will setup your Virtual Private Server (VPS) at a hosting facility in your region, and will install, configure and manage the software according to your peferences. Ozeki Managed Hosting service includes Silver technical support.
Ozeki Kft.
Office hours
Monday to Friday 9:00 - 17:00 CET (GMT+1)
Head office
Ozeki Kft.
1-5 Nagy Lajos kiraly ter
Debrecen, Hungary
4032
Budapest office
Ozeki Kft.
Violda u. 20-24/B.
Budapest, Hungary
1094
Phone number
+36 1 371 0150
Government
Year of registration: 2000
Registered in: Budapest, Hungary
Registration number: 01-09-728508
EU VAT number: HU12462128
Our preferred way of communication is e-mail.
Please send your e-mail to:
info@ozeki.hu
Chat
You may also contact us on Ozeki Chat. The following links explain, how you can get in touch.
How to use Ozeki Chat form an Iphone mobile
How to use Ozeki Chat form an Android mobile
How to use Ozeki Chat form a Webbrowser
How to use Ozeki Chat form a Windows desktop
Worldwide support
Ozeki on-line support gives you peace of mind so you don't have to worry about your system. Our experts can help you configure and maintain your service. Our commitment to product innovation and continous development secures your technological future, helping you fully benefit from our products.

About us
For more information about Ozeki Ltd. and our amazing products please visit our offical website at https://www.ozeki.hu.
Jobs
If you are interested in working for Ozeki please visit our carriers page and check if there are any suitable openings for your at https://jobs.ozeki.hu.
Download
You can download the latest version of Ozeki Installer by clicking on the link below. After download, you need to unzip it and run the installer in the zip package.
Ozeki Installer v10.4.18Updated: 2024.01.07.
- New feature (SMS alerts): SMS network connections can be monitored and SMS messages can be sent when the monitored connection goes down
- New feature (E-mail alerts): SMS network connections can be monitored and E-mail messages can be sent when the monitored connection goes down
- New feature (WhatsApp alerts): SMS network connections can be monitored and WhatsApp messages can be sent when the monitored connection goes down
- Improvement (SMPP): SMPP pdu encoding is imporoved
- Improvement (Task scheduler): The task scheduler app in the system is improved and some bugs in it were fixed
- Improvement (SMS modem support): 4G and 5G SMS modem support is added to the system
- Improvement (SMS modem speed): Modem communication speed and SMS delivery speed accross all modems are improved
- Improvement (SMS character encoding): SMS character encoding on GSM modem links is improved
- New feature (WhatsApp): The system now offers connection to WhatsApp. You can send and receive WhatsApp messages.
- New feature (SMS messenger): The SMS messenger GUI was significantly improved. On the new GUI SMS campaigns can be imported from Microsoft Excel Shet
- New feature (SMS delays): It is possible to send out SMS campaigns with delays between each SMS. This is great if you expect people to call you back. For example if you send out a text every 2 minutes the incoming phone calls will not overwhelm your call center.
- New feature (Silent SMS support): You can now send SMS messages that are not dislayed or saved on mobile devices. This technology is also called as ping sms, stealth sms or silent sms. The recipient of a silent SMS will not notice that he received a text. However a delivery report is returned to the sender. This is a great tool to monitor the on-line connectivity of IoT devices without interfearing with their standard operation.
- Improvement (SMS marketing integration): Integration with the Ozeki SMS marketing system available at https://myozeki.com platform was added
- Bug fix (Memory managment): A memory leak was found and fixed.
- Bug fix (SMS routing): On some systems the SMS routing failed after a certain amount of time in high message load environments. This problem was caused by a synchrnoization issue between threads. It happend on powerful CPUs that executed many threads simultaneously.
- Bug fix (SMS folders): Moving messages to the inbox was not possible in the message folder view. This bug is fixed
- Bug fix (Ozeki alarm): A compatibliity issue in the Ozeki Alarm system was fixed, that caused it to not work with newer SMS gateways
- New feature (Delivery report matching): The a new form was added to the server preferences, that allow you to configure the delivery report matching policy. This allows you to select the appropriate delivery report storage architecture for your environment. Standard lists, B-Tree, Non-cached file storage can be selected.
- Improvement (Memory consumption): The memory consumption of the software is optimized to work with lower memory requirement.
- New feature (Text to speech): The SMS Gateway can read out SMS messages on the PC speaker.
- New feature (Play sound): The SMS Gateway can play a beep sound on the PC speaker if an SMS messages is sent or received (depending on configuration).
- New feature (Play audio file): The SMS Gateway can play an audio file (e.g.: mp3, wav, etc) on the PC speaker if an SMS messages is sent or received.
- Improvement (SMS delivery report matching): The SMS delivery report matching engine has been improved
- Improvement (Boot time): The startup sequence was improved to offer faster load times
- Improvement (Bulk messenger): The Bulk messenger has been improved to allow simultaneus job execution
- Improvement (Bind limits): The number of allowed simultatnous TCP/IP links per user can be limited on SMPP connections. This feature is useful for SMPP service providers
- Improvement (SMS connecttions): The type selection for SMS connections became better. New SMS service providers were added and the presentation of them was improved to find the appropriate SMS connection type easier.
- New feature (Android SMS Logging): The communication with the Android SMS client is now logged fully. This allows better system management.
- Improvement (REST): The segmentation and reassembly (SAR) protocol layer was removed from the REST SMS clients. This layer was never used, since these SMS service providers perform this functionlity.
- Improvement (MADAPI): Small improvements and optimizations were done on the MADAPI SMS client
- New feature (HTTP API): The HTTP API response can be configured to include the DTD header.
- Improvement (Security): Some security updates have been implemented.
- Improvement (Android): Commincation with the Android SMS client became more efficient.
- Bug fix (VoIP): The VoIP instant messaging was not working properly on all devices. This poblem has been fixed.
- Improvement (SMPP/Security): The TLS version can be configured for this connection type.
- Improvement (UCP/Security): The TLS version can be configured for this connection type.
- Improvement (CIMD2/Security): The TLS version can be configured for this connection type.
- New feature (Mozeki.com): The Ozeki account is now integrated with myozeki.com
- Improvement (Cluster): The custom connection string configuration data is preserved during cluster takeovers and server restarts
- Improvement (Database reporting): The database reporting feature has been improved to provide longer timeouts for slow database connections
- Improvement (Oracle): The database messaging feature has been improved to allow automatic database connection reestablishment in case of broken database links. This is especially important for Oracle databases.
- Improvement (Chat protocol): A new chat protocol was introduced in this version. This protocol uses JSON/HTTP REST requests to communicate with the chat server, and can be supported by web based apis and mobile clients
- New feature (Message scheduler): A new app is added to the system, that allows you to setup scheduled messages. You can define a calendor of holidays, business days/etc, and use working hours, and period events to setup your scheduled messaging jobs
- Improvement (Log system): New connections are logging to the correct locations. Log files are removed after connection uninstallation. Several bugs and performance enhancements have been done in the logging system
- Improvement (Chat system): The chat subsystem is improved to offer JSON/REST API access
- Bug fix (Character encoding): A character encoding issue was fixed. It was effecting unicode characters on SMPP links
- Improvement (SMS): The Sender ID can be adjusted in the Autoreply system
- Improvement (Chat client): The chat client can connect to multiple servers
- Improvement (Installer): The installer package has been improved
- Improvement (HTTP API): The HTTP API performance has been improved and several bugs were fixed
- Improvement (P2P): The P2P messaging capabilities were improved
- Improvement (GUI): The graphical user interface was improved to provide better response times.
- Improvement (SQL SMS): The SQL console of the SQL to SMS connection is improved to track configuration changes in the database connections
- Improvement (SMS Database): The database messaging feature has been improved. The sender and recipient phone numbers of SMS messages are stripped from special characters. For example phone numbers in the form +441234567@% are now inserted as +441234567.
- Improvement (SMS Database): Four new keywords can bed used in the SQL templates for both incoming and outgoing SMS messages: $fromconnection, $fromaddress, $toconnection and $toaddress. For example in SMS messaging the $fromconnection and $twoconnection contains the names of the SMS service providers used to send and receive the SMS. The $fromaddress and $toaddress contain the sender and recipient phone numbers. This new feature can be used to have more information about each message.
- Improvement (Cache): The client side caching of JavaScripts serving the graphical user interface (GUI), has often led to problems. This cache mechanism is improved, to make sure, that always the latest Javascripts are used in the browsers.
- Improvement (Security updates): A major security review of the system was performed, and several features were updated to provide better security.
- Improvement (Http connections): The HTTP client connections were improved. Now all SSL/Tls versions are supported and negoiated properly, and the SSL client and SSL server servtificate verification is customizable
- Bug fix (Smaller bugs): Several smaller bugs related to SMS forwarding are fixed.
- Improvement (Oracle): The Oracle database capability was improved to handle columns with large data sizes.
- New feature (SMPP): The address range parameter of SMPP bind requests can be adjusted independently of the primary phone number of the connection
- New feature (Autoreply): Messages going through the autoreply look can now ask for delivery reports
- Improvement (Security): Security updates were implemented.
- Improvement (SSL certificates): The SSL certificates have been updated, because of expired dates
- Improvement (GUI components): The performance of some GUI elements were improved
- Bug fix (Minor bugfixes): Several smaller bugs were fixed
- New feature (Text to speech): The robot developer app got text to speech capabilities
- New feature (Safe logging): You can configure the system to hide phone numbers and message text in the logs.
- Improvement (Uninstall button): The uninstall button was removed in the sms messenger app for standard users.
- Improvement (Android): The SSL key management on Android phones are improved
- Improvement (Android): Unnecessary permission requests are removed on Android
- Improvement (Database messaging): The sms from database feature is improved. The logging is better.
- Improvement (Service list): The advanced/services form of the SMS gateway displays more information now.
- Bug fix (Database messaging): Periodic folder cleanup did not work for SQL messaging. It is fixed.
- Bug fix (Http user): Periodic folder cleanup did not work for the HTTP user. It is fixed.
- Bug fix (Http user): The XML response could not handle XML specific characters, such as tags and quotes. It is working now.
- Bug fix (Browser cache): On mac laptops, the browser cache management had a problem, that needed a workaround. Some user pages were loaded from cache instead of the sms software.
- Improvement (Compatibility): This version has several compatibility improvements with older Ozeki versions
- Bug fix (Datbase ID): A bug was fixed in the SQL reporting related to database IDs
- Bug fix (Vresion compatibility): The previous version had a compatibility issue with older versions. This is fixed.
- New feature (HTTP REST API / message download): The json based http rest api got a new command, that allows you to download sms messages from the inbox of a particular user
- New feature (HTTP REST API / message delete): The json based http rest api got a new command, that allows you to delete sms messages from the inbox of a particular user
- New feature (Ozeki REST API): The SMS subsystem was extended with a new HTTP API. This API allows you to send SMS messages with JSON encoded HTTP post requests. The old HTTP API is still in place, and we have no plans to discard it. Both APIs, the HTTP GET/xml based API and the HTTP POST/Json API will be supported long term
- New feature (HLR lookups): The SMS gateway can be configured to do HLR lookups for each SMS before it is sent. The HLR information can be used in routing and can be stored in the reporting database. More information is available in the how to do HLR lookups guide/li>
- Improvement (Logging): Some unneccessary log messages have been removed.
- Improvement (HTTP SMS API server side): Ozeki SMS Gateway is now able to accept HTTP requests in formats for various SMS service providers. If you are not happy with your current SMS service provider, and you wish to switch to Ozeki, you can do that without having to rewrite your code.You simply have to point to your Ozeki SMS Gateway HTTP API url. You can switch from Twilio, Infobip, Clicksend, Clickatell, Messagebird, Sinch, Telnyx, Vonage to Ozeki with ease.
- Bug fix (Memory leak): A memory leak has been fixed.
- New feature (HTTP Rest client): A customizable HTTP REST sms api connection is added. To support custom JSON and native HTTP SMS client connections
- New feature (Sinch): A new sms service provider connection was added to allow direct connection to Sinch
- New feature (Clickatel): A new sms service provider connection was added to allow direct connection to Clickatel
- New feature (Vonage): A new sms service provider connection was added to allow direct connection to Vonage
- New feature (Infobip): A new sms service provider connection was added to allow direct connection to Infobip
- New feature (Clicksend): A new sms service provider connection was added to allow direct connection to Infobip
- Improvement (Email to sms): The email to sms and sms to email features are improved, to support SMS addresses in the email subject line
- Improvement (Android SMS): The android permission settings are improved. The software runs with a smaller number of permissions.
- Bug fix (C# formula modifier): You can modify SMS messages with a C# algorithm. The C# algorithm can be added to a route in the routing table.
- Bug fix (SMS encryption): You can encrypt/decrypt sms messages with a pre shared key in the routing table. This feature had a bug, that is fixed.
- Bug fix (Android file manager): The Ozeki file manager on Android was not working properly. It is fixed.
- Improvement (E-mail to SMS): Goggle mail support is improved
- Improvement (Text file user): The text file to sms feature did not request delivery report by default. This is fixed.
- Bug fix (GSM modem): The deliery report handling in the GSM modem had a bug, that was fixed.
- New feature (HTTP REST API client): A new connection is created to send messages over HTTP REST API services. This connection can encode a message in JSON according to various specifiations. It makes it possible to post SMS messages as JSON requests to almost any HTTP REST API SMS service. User authentication (api keys, usernames, passwords, etc) can be included as JSON variables, or they can be put into the HTTP request header. This in excellent implementation.
- New feature (HTTP REST API service): You can provide an HTTP REST API sms service to your users. The HTTP API of Ozeki 10 SMS gateway way improved to accept REST API requests. The users can encode their messages in JSON and post it to the built in Ozeki HTTP server. The Ozeki HTTP REST API is compatible with the request format of many SMS service providers, so switching to Ozeki from an existing service is very easy.
- New feature (Twillio client): A new service provider connection was added to make it easy to connect to the Twillio SMS service
- New feature (Telnyx client): A new service provider connection was added to make it easy to connect to the Telnyx SMS service
- Bug fix (GSM modem): The GSM modem could not receive multipart SMS messags properly due to an error. This bug is fixed.
- Bug fix (Android version): The logging on the SMS connections in the Android SMS Gateway was improved.
- Bug fix (POP3): The POP3 client and server was reviewed and some bugs were fixed. A disconnect/reconnect issue that was due to special characters in the username was fixed.
- New feature (Credit limits): A new feature was added, that allows you to set one time or daily, weekly, fortnightly or monthly credit limits for connections
- Improvement (HTTP API): The HTTP API was reviewed and several bugs were fixed
- Improvement (Android release): Tha android version has been improved.
- Improvement (Android): Overall iomprovements and bugfixes in the Android version
- New feature (Android): The first version of Ozeki 10 SMS Gateway for Android is released
- Improvement (HTTP API): The HTTP API evaluates URL templates better
- Improvement (HTTP API): The HTTP API compatibilitiy with previous versions have been improved
- Bug fix (Database reporting): The database reporting details page did not work properly. This bug is fixed.
- New feature (Android): The Ozeki SMS Gateway is now available for Android phones. It supports dual sim devices as well.
- Improvement (SMS): The delivery report matching has been improved.
- Improvement (Composer): The message composer form remembers the last phone number
- Bug fix (Message validity): The message validity period takes into account the scheduled date
- Bug fix (HTTP API): If multiple messages were sent on the HTTP API, the XML response was invalid. This is fixed.
- Compatibility (HTTP API): The HTTP API was improved to make it compatible with Ozeki NG SMS Gateway
- New feature (Uninstall button): Uninstall buttons were added to the connections, to make uninstallation easier
- Improvement (GUI): The MPM label is improved to provide accurate measurement for slow connections.
- Improvement (Ozeki Account): The Ozeki Account security has been improved
- Improvement (SMPP): The submit reference matching is improved. Delviery reports are metched with upper, lower and mixed case submit reference strings.
- Improvement (SQL persistence): The sql query evaluation is improved to provide more protection from SQL injection threats.
- Bug fix (Addrebook): The address book import feature had a bug, that prevented phone numbers being imported. This bug is fixed.
- Bug fix (GUI): The browsre cache prevented the update of the configuration form in some cases. A workaround was put in place to handle this issue
- Bug fix (SMS): The configuration forms did not preserve some values. This bug is fixed.
- Bug fix (Chat): A bug could cause a message loop. This bug is fixed.
- New feature (Context menu): The context menu was improved, to support file open with the right click
- Improvement (Addressing): There was an inconsistency in the addressing scheme. In a message therere are 3 types of addresses: station ID, connection ID, address. The station ID referes to the computer where the messages is coming from. The connection ID contains the name of the connection, for example SMPPlink1, the address contains the actual address, eg. +36123467. The inconsistency happened when the address field was empty. In this case, in some parts of the code the connection ID was inserted in place of the address, in other situations it was left empty. This inconsistency is resolved. The connection ID is NOT inserted into the address fieled if it is left empty. If you did not configure a default address for a connection (e.g. a default phone number in the SMPP link), make sure you have one configured now.
- Bug fix (Route link): The route name link did not work properly. It pointed to an invalid URL. It is fixed.
Ozeki Installer v10.3.82
- New feature (Chat server): The chat server has been improved. The store and forward capability is much faster now.
- Improvement (Chat): The chat client has been improved to support forms and HTML content.
- New feature (SMTP server): The built in SMTP server now support SSL. Two methods can be used: STARTTLS and SSL / TLS.
- New feature (SMTP server): A new authentication method was added to the SMTP server. It can authenticate clients with a username present in the E-mail header. A special e-mail header field was introduced called x-ozeki-auth. And username and password can be provided in the following format: x-ozeki-auth: user; password
- Improvement (IMAP server): Microsoft Outlook support is added to the built in IMAP server. Outlook uses some non-standard parameters which are now supported in Ozeki
- Bug fix (Chat): The chat client displayed duplicate messages on some slow systems. This bug is fixed.
- New feature (SQL reporting): SQL reporting used by SMS service providers is improved. A new tabpage was added to the SQL console (check the bottom), that allows manual modification of SQL templates used for querying the database.
- Improvement (Licensing): The product activation system removes trial license codes automaticall if active codes are enterd
- Improvement (Keepalive): The keepalive algorithm now monitors network traffic. It will only send out keepalive requests if there is no traffic for a configured amount of time on the link. This improves connection speeds on high capacity IP SMS links, because no keepalive traffic is generated under heavy loads.
- Improvement (SMS submit timeout): The submit timeout value of IP SMS connections have been increased from 10 seconds to 25 seconds. The change was applied to support providers accessed through very slow connections and to support providers who provide a slow service.
- Bug fix (Reporting database): The reporting database configuration form did not allow the password to be changed. If you have updated the password, it still tried to connect with the old. This bug is fixed.
- Bug fix (SMS outbox): In some routing configurations SMS messages could get stuck in the outbox of users. This bug is fixed.
- New feature (Access): Microsoft Access support is added to make it easy to send/receive chat messages and sms messages from Access database tables.
- New feature (Excel): The HTTP API was improved to support Microsoft Excel. Now Micrsoft Excel can be used to send chat messages and sms messages. This feature is loved by office users, because they like to create excel spreadsheats with a list of phone numbers and messages texts. Now they can send message directly from Excel with the click of a button.
- Improvement (SMPP client): The delivery report matching feature of the SMPP client has been improved. In case the SMPP service provider returns the submit reference in lower case hex digits, and after this it returns the delivery report reference as an integer, the delivery report will be matched. (In the previous version we expected upper case hex representation. This version handles both: upper case and lower case)
- Improvement (Chat GUI): The chat GUI had some cosmetic improvements to make it look nicer
- Compatiblity (HTTP API): The compatibility of the HTTP API is improved to support HTTP clients developed to operate with Ozeki NG SMS Gateway.
- New feature (Logs): Daily log rotation is introduced to save disk space
- New feature (SQL to chat): Chat messages can be sent from SQL databases
- New feature (HTTP to chat): Chat messages can be sent using HTTP requests
- Improvement (Logs): The log file names are updated to make them free of spaces and special characters
- Improvement (Control panel): The help section of the control panel app is improved
- Improvement (P2Pl): The P2P network connection setup is improvied
- Improvement (Routing): The advanced page of the routing match conditions did not make it possible to install new custom conditions. This issue is resolved. Now you can install and configure custom matching conditions
- Bug fix (Routing GUI): The text matching routing rule GUI did not provide correct examples for matching patterns. The examples are corrected.
- Bug fix (UCP connection GUI): The GUI had two configuration tabs. Now there is only one.
- Improvement (P2P stack): The link setup between chat clients and the server discovery was improved.
- New feature (Installer): A new dialog window is created to help you follow the progress of the installation from the app store
- Improvement (Installer): The ozeki store / installer feature now downloads all components before it starts the installation. The previous version did the two steps simultaneously, which could lead to errors in case of instable network environments.
- Improvement (P2P): The chat network link setup functionality is improved.
- Improvement (P2P): The chat server is improved. It allows simultaneous connections from multiple (e.g.: LAN and WAN ip-s).
- Improvement (Keepalive): The keepalive/automatic reconnect functionality is more intelligent in messaging connections, such as SMPP
- Bug fix (SMTP): The built in E-mail server (SMTP) had a bug, that prevented it to accept some e-mails. This bug is fixed.
- Bug fix (SMPP): The password box of the SMPP client did not work porperly. It is fixed.
- Improvement (Security): The login form security is improved
- Improvement (Security): Remote chat clients are not allowed to commicate with local connections unless explicit permission is granted
- Improvement (Security): Chat users are only allowed to login on the local computer
- Improvement (Security): Friendships are not established automatically in the chat client
- Improvement (Security): Tunnels used for voice calls are not enabled by default
- Improvement (Ozeki account): The Ozeki Account app allows you to edit your security details, such as login e-mail, password, etc.
- Improvement (UDP): The UDP link management for all services based on UDP/IP is improved
- Bug fix (Keepalive): The automatic reconnect of lost network connections feature had a bug, that prevented the reconnection in some cases
- Bug fix (Imap): The Imap client had a bug, that is fixed.
- Bug fix (Database): The SQL query building had a bug, that is fixed. This prevented some SMS messages to be saved into the database. (Happened very rarely, but it had to be fixed)
- New feature (Unified version numbers): The version numbers are synchronized accross Ozeki products, to help compatibility when multiple products are installed on the same computer. This is why you see a big jump in the versioning of some products.
- New feature (IMAP): We have implemented the IMAP client protocol. Now you can connect your system to e-mail servers through IMAP (both plain and SSL connections are supported). This allows you to create great e-mail gateway setups, such ash e-mail to chat or e-mail to SMS.
- New feature (SMS to Chat): If you install the Ozeki Chat server and the Ozeki SMS Gateway apps, you can chat with mobile phones in SMS. This gives the same experience you would get in a standard chat application.
- New feature (Email to Chat): If you install the Ozeki Chat server and the configure an IMAP or POP3 client connection, you can chat with e-mail contacts, as you would chat in a standard chat application
- Improvement (Chat): The chat transport now supports both UDP and TCP connections
- Bug fix (HTTP API): The HTTP API did not work because of an obfuscation error. This bug is fixed.
- Bug fix (Friendship delete): If a P2P friendship was deleted, the information was not transfered to all clients. This bug is fixed.
- Bug fix (File transfer): The P2P file transfer for encrypted connections had a bug, that is fixed now.
- New feature (SMPP user): On the SMPP user s config form, in the Advanced tab page in the delivery report group box you can select Hex formatted submit reporting. If you enable this option, the SMS submit reports returned to incoming SMS messages to your SMPP customers, will be in Hex format. Note that the delivery reports will contain the format as Integer numbers.
- Improvement (Delivery reports): Some SMPP providers return the submit reference in Hex format and the reference in the delivery report is sent by them in int format. Our previous SMS gateway, Ozeki NG SMS Gateway were able to handle this setup, it could match delivery reports in this case. This functionality was added to the SMPP client connections in Ozeki 10. If you use SMPP SMS connections in this product, and you experienced problems with delivery reports, this fix will solve the problem.
- Improvement (Password form): The appearance of the password change form is improved
- Bug fix (Memory leak): Another memory leak was discovered, that could impact long term operations. This is fixed.
- New feature (Automatic updates): Automatic updates are available from this version on.
- New feature (Chat): If P2P communication is used availabilty of remote parties are handled more efficiently
- Improvement (Logging): The overall quality of log entries have been improved. Several meaningless leg entries were removed from the logging system.
- Improvement (Text to speech): The text to speech capability is improved. Now individual browsers and browser tab pages can be address to read out text.
- Improvement (Database reporting): The reporting system (e.g. reporting database) is not recording suplementary messages.
- Bug fix (Memory): A memory leak was discovered. It is fixed.
- Bug fix (Stability): An unexpected exception could occur during heavy network, that could cause the Ozeki service to stop unexpectedly. This bug is fixed.
- Bug fix (GUI): In cases of parallel GUI access some GUI components were duplicated on the screen. This bug is fixed.
- Improvement (GUI): The graphical user interface has been improved.
- Improvement (Performance): The overall performance of the Ozeki Installer System has been improved. You will experience faster display times, faster load times and a better installation experience.
- Improvement (Installer): The uninstallation procedure is improved
- Improvement (Upgrade): The upgrade procedure is improved
- New feature (Phone system): The Ozeki Phone System supports display name based dialing
- Improvement (Camera recorder): The camera recorder fixes invalid SDP packets. This means RTSP camera streams are handled in a more fault tolerant way
- New feature (Camera Recorder App): The camera recorder app allows you to control ip cameras, usb cameras and other video sources. You may setup recording rules based on events, time schedules or other configurations.
- New feature (Classroom App): This app provides all the tools neccessary to teach online. It offers a digital white board, the teacher can share documents, and can hold presentations or synchronized video viewing. This app features a built in chat and and an audio and video conference.
- New feature (SMS gateway): Windowing was added to support overrlapped processing and network transfer. This is a great performance boost for IP SMS gateway systems, such as SMPP gateway.
- Improvement (Phone system): Video support was improved relay calls
- New app (Ozeki classroom): The Ozeki Virtual Classroom is now available as an app for download
- Bug fix (UCP connection): The XSER field encoding had a bug. It has been fixed in this new version.
- Improvement (SMS Gateway): The speed of the SMS gateway is improved
- Improvement (Bulk Messenger): The Bulk Messenger GUI responsiveness is improved
- Bug fix (Chat Client): The Chat Client Exit on the taskbar will close all processes
- Improvement (Chat system): The installation procedure of the chat client is improved
- Improvement (Progress indictation): Better progress indication during the installation procedure
- Improvement (Digital signatures): The digital signature handling has been improved.
- Improvement (Security): The certificates used for digital signatures have been updated
- Improvement (Installer upgrade): The installer upgrade procedure has been improved.
- Improvement (Delivery reports): The submit reference management for SMPP connections have been improved in the SMS gateway app.
- New feature (Ozeki Phone Syste): This installer makes it possible to install the Ozeki Phone System
- New feature (Delivery reports): The SMS delivery report tracking is better. The logs are improved to make it easy to find which message a certain delivery report belongs to
- New feature (SQL reporting): The SQL reporting to database feature is improved, to automatically write SQL commands into a text file to handle situations when the database server goes offline.
- Improvement (Folder management): The message folders are renamed to make it easier for the users to identify their roles. If messages are moved to the outbox folder, they will automatically be sent.
- New feature ():
- New feature ():
- Improvement ():
- Improvement ():
- Bug fix ():
- Bug fix ():
- SQL Reporting: The SQL reporting performance has been signifacantly improved to support message volumes up to 500 MPS (Messages Per Second) in real time. This is achieved by grouping SQL updates into batches.
- GUI: The performance of the graphical user interface has been significantly improved by introducing more control over client browser caching.
- Message delivery engine: The performance of the message deliery engine has been improved by automatically removing message sources, that are not ready to provide messages for submission.
- System load: The performance of system startup is significantly improved, by using parallel threading to load messages queues.
- This is the first public release of Ozeki Installer. Ozeki Installer is a very easy to use software, that can be used to download, install and update your selected Ozeki products. Ozeki 10 offers many apps and features and this installer package will help you choose which ones you need. You can use this installer to setup the latest version of Ozeki SMS Gateway, Ozeki Chat, Ozeki Phone System and many other magnificent software packages.
- New feature (IMAP server): This version includes a fully featured IMAP server. This allows e-mail clients, such as Mozilla Thunderbird to access messages in Ozeki as they would access massages on an e-mail server. Multiple IMAP clients can access the same user account. This makes team cooperation easy
- Improvement (Multiple, custom queues): The system allows the user to create custom message folders (throught the IMAP protocol)
- Bug fix (UCP client): The sequence numbering of the UCP client connection had a bug. This was fixed.
- Bug fix (Chat): The built in chat system was improved. Several bugs were fixed.
- New feature (PBX): The Ozeki Phone System app is included in this version. This is app will take over the functinality of the classic ozeki PBX available at www.ozekiphone.com.
- Improvement (Chat): The built in chat server and chat client functionality is improved. Several bugs were fixed.
- Improvement (HTTP API): The HTTP API is improved to support PBX interactions and (SMS) mobile messaging
- Improvement (Chat): Both the built in chat server and the chat clients have been improved. The chat provides a great user experience and is a great tool for teams to communicate securely
- Improvement (SMS): Several SMS protocols have been added. The SMPP, UCP, CIMD2, etc protocols work very well. They offer connectivity to the mobile network over IP. You can use secure (SSL/TLS) links.
- New feature (PBX): The first version of the Ozeki Phone System APP is included in this version. This app is not fit for production at the moment, but as a preview, it gives you an idea on how to use voip phone lines.
- New feature (File manager): We have added a great file manager app, which is fantastic, if you run Ozeki 10 on embedded systems, such as a Raspberry Pi.
- Improvement (Linux + Raspberry Pi): The Linux package now works on both Intel based and Arm based Linux systems. You can install it on Ubuntu, Debian or a Rapsberry Pi. No separate package will be required from now on for Arm systems.
- Improvement (SSL Certificate Validation): The SSL layer was improved to support enhanced certificate validation for both client and server SSL connections. You can validate the remote party using a custom CA or using a trust chain derived from the system certificate store. This new features allows your to prevent man-in-the-middle attacks for secure connections. This improvement was added to the following SMS connections: SMPP Server, SMPP Client, CIMD2 Server, CIMD2 Client, UCP/EMI Server, UCP/EMI Client.
- Improvement (SSL Certificates Creation): The security app was improved to make it easier to create and sign SSL certificates. Now you can not only create and sign X509 certificates, but you can also specify the usage flags on the graphical user interface. This makes it easy for you to restrict how an issued certificate can be used. For example it can be setup for code signing or you can allow cert signing or encryption.
This version was dedicated to improve the mobile messaging (SMS) capabilities of the platform. The major SMS protocols were added, to make direct connection possible over the Internet to SMS service providers. The SMS modem capabilities and SMS encoding and decoding capabilities were improved. Automatic SMS connection selection was also included.
- Improvements in the SMS Gateway app
- Improvements in the Lego connection
- Improvements in the SNAP programming app
- New feature: SMTP server service
- New feature: UCP server service
- New feature: CIMD2 server service
- New feature (UCP Server): This version includes an UCP SMS server. This service allows you to setup user accounts, that can connect over the network to your system, and can send and receive SMS messages.
- New feature (UCP Client): This version includes an UCP SMS client. This UCP SMS client allows you to connect to SMS service providers using the UCP/EMI protocol and it allows you to send and receive SMS messages.
- Improvement (SMS message folders): The message folders can be viewed in an e-mail client like fashion, in which all messages can be opened like an e-mail message. When an SMS message is opened, you can see the full delivery history and event log of the message, including the submit and delivery reports. These reports contain the submitted PDU-s and the message reference IDs returned by the GSM network or the SMS service provider.
- Improvement (Android SMS support): If you install Ozeki 10 on Android mobile phones, the built in SMS client will work on phones using new Android versions as well (API Level 24+). This improvement was neccessary to enable SMS functionality on Samsung Galaxy S8, S9 and newer phone models.
- Improvement (SNAP programming language): The SNAP programming language included in the software can be used for education. In this version this whole system was reviewed and made better. New blocks were added to extend the basic functionality, and overall performance, stability and responsiveness was improved.
- Improvement (Android sensors): Support for new android hardware sensors were added to the system (more then twenty different sensors are supported now). These sensors can be accessed locally through local programming APIs, from SNAP, from databases or remotely using the Ozeki APIs.
- Improvement (Lego robot sensors): In this version the Lego robot connection was improved to offer more features and to provide better access to the sensors and motors, that come with Lego Mindstorms EV3. These ipmrovement work well with the SNAP programming language. This is great for education.
- New feature (Lego EV3 support): This version offers full support for the Lego Mindstorms EV3 robot platform. This is great if you wish to use Ozeki 10 for robotics education. Ozeki 10 now gives you full access to the Lego Brick over a bluetooth connection, and it allows you to control following sensors: Ultrasonic sensor, Infrared sensor, Color sensor, Gyro sensor, Touch sensor. It also supports controlling the EV3 motors, and you can read out the motor encoder value to know at which angle a certain motor is. Of course the built in sensors of the EV3 brick are also supported: LED, LCD display and the built in buzzer.
- New feature (Snap app): Lego Mindstorms EV3 support is now built into SNAP. This makes it easy to teach robotics programming with this fantastic, simple visual programming language. This new Lego EV3 extension offers simple building blocks to read sensor values and to control motors. It is fun and super easy to use.
- New feature (Snap app): The snap app now supports gamepads. One or more gamepad can be connected and simple games can be created. The gamepad blocks can also be used with the Lego EV3 blocks to achieve simple robot control.
- New feature (Snap app): The snap all will keep the code under construction in the editor persistently. Even if you shut down your computer, when it comes back again, the code will still be in the editor.
- New feature in the Windows version: Automatic camera discovery on all ONVIF IP cameras on your local network.
- New feature in the Camera Recorder app: It is possible to export and import any camera configuration to xml or json format.
- New feature in the Ubuntu and the Raspbian versions: All Ozeki Arduino libraries added to the Ozeki 10 linux versions. The libraries can be found at /usr/share/arduino/libraries.
- New feature in the Android Chat Client: It has a new user interface.
- Improvement (SMS/SMS over Http): The HTTP server connection was improved to accept incoming HTTP SMS Client connections
- New feature (Camera app): A list view was added to the camera manager app. The toolbar of the app has been improved.
- New feature (Camera app): The camera images can be flipped horizontally and vertically and rotated.
- Bug fix (Camera / license plate recognition): The license plate recognition did not work, because there was a bug int the computer vision library. This bug is now fixed
- Improvement (Google maps connection): Multiple markers and text can be displayed on the map
- Improvement (Google maps connection): GPS parsing, GPS coordinates from Android phones are parsed correctly and can be displayed on the map without modification
- New (Windows location): Windows GPS and windows location sensors are now supported. You can use external USB GPS on windows or built in locations sensors, such the ones you can find on Surface tablets and laptops
- Improvement (Chat server): The built in P2P chat server and P2P chat client is improved to support multiple domains.
- New feature (SMS Wall App): The SMS Wall toolbar got a Clear button, that allows you to clear the displayed SMS messages.
- New feature (SMS Wall App): The messages on the SMS wall are saved to the disk, and are displayed again after power outage.
- Improvement (SMS Wall App): If an SMS connection is installed in the SMS Wall app, no routing rule is needed. All SMS messages coming from the installed connection will be displayed on the wall.
- Bug fix (SMS Wall App): The message highlighting on the wall had a bug. The highlight flag was lost on server reboot.
- New feature (Camera recorder App): The camera name and the date/time can be displayed on the video stream as an overlay.
- New feature (Camera recorder App): Recording can be forwarded as e-mail.
- Improvement (Camera recorder App): A more user friendly toolbar has been created for the camera recorder app.
- Improvement (All connections): The message preview now displays both the sender/recipient address and sender/recipient connection information.
- Bug fix (SMPP SMS connection): The SMPP IP SMS connection had a bug, that could occur when multipart SMS messages were received. This bug is now fixed.
- Bug fix (GSM Modem SMS connection): Low level logging is improved (and switched to disabled by default on the config form).
- Improvement/camera recording app: New recording options are available for every camera (All IP cameras and USB cameras). Full screen viewing option was added to every camera (IP cameras and USB cameras).
- New feature/camera recording app: The split view camera device was implemented that allows you to display 4, 9, 25 or more camera streams on a single monitor. The split view camera works as any standard camera, so all options (snapshot, recordings, etc), that you can use for standard USB and IP cameras are available on the split view camera stream as well.
- Bug fix / bulk messenger app: The bulk e-mail feature had a bug in reporting. It did not report properly whether an e-mail was sent or not. This bug is fixed.
- Improvement / Modbus protocol: Support for new modbus devices are added to the system including impulse counters for smart energy meters.
- Improvements/Bugfixes: The Ozeki Bulk Messenger App has been improved to support call progress indication, and several bugs have been fixed.
- New feature: Browser Gamepad Connection. A new connection type is available to allow you to control bluetooth gamepads through webbrowsers on mobile phones and desktops.
- New feature: Browser Orientation connection. A new connection is available that can be used to report the orientation of a mobile phone. This is useful for Virtual and Augmented Reality robot applications.
- New feature: Camera recording app. The new camera recording App included in this version, allows you to record video from USB and IP cameras. One of the best features of this new app, is that it supports pre and post event recording. This means, that it continuously caches the video stream, and if an alarm or any other event is triggered, it can store the video recording before and after the event. For example if an incident takes place at 3p.m. you will have a recording of the period from 2 p.m. to 4 p.m.
- New feature: Task scheduler app. We have added an advanced task scheduler app, that allows you to schedule periodic message sending. You can select, minutes, hours, day of month, month of year and day of week periods. You can also setup a calendar for business days, school holidays, etc and take into account the days defined in your calendar when you create a scheduled task. We use this task scheduler in our office to control the building (hot water, lights, power, etc). This is a very cool feature.
- New feature: Modbus connection. Now you can use Modbus devices on RS485 and Modbus TCP (Modbus over IP) connections. The software supports both Modbus ASCII and Modbus RTU modes on the link. This feature can be used to communicate with any Modbus capable device. We have built in native support for Modbus Realy-s, Modbus Temperature sensors, Modbus smart electricity meters, and smart Input Output (I/O) units.
- Improvement: The car number plate recognition connection is improved. It works very well for European and American number plates. Ozeki 10 v10.0.73
- Improvement in GSM Modem and SMPP connections.
- Improvement in Bulk Messenger function.
- Improvement in Robot controller function on Linux versions.
- Improvement in USB camera handling on Linux versions.
- New feature: License plate recognizer allows you to recognize license plate numbers on your camera feed.
- New feature: Barcode scanner is capable of recognizing and reading barcodes or QR codes on your camera feed.
- New feature: Motion detector allows you to detect motion of people or moving objects.
- New feature: Face detector allows you to detect faces on your camera feed.
- New feature: Circle detector allows you to detect circles on your camera feed.
- New feature: Frame capture filter allows automatic frame capturing periodically between a specified time interval.
- Improvement in Text to Speech engine.
- New feature: Database polling can be switched on and off in database messaging.
- New feature: If multiple arduino devices are attached with the same id the system will automatically switch to the last attached device.
- New features: Ozeki Chat client can be configured to start with windows.
- Installation speed has been improved.
- Message delivery speed has been improved.
- New feature: Text to speech function. Using this Text to Speech connection allows you to read out text in your browser window.
- New feature: Orientation sensor. It allows you to be notified of changes in the orientation of your device from your browser window.
- New feature: Web Speech to Text connection allows you to recognize speech from your web browser window.
- Bugfix in the installer of Linux version.
- Bugfix in the SMS Gateway function.
- Download Ozeki 10 for your Windows or Linux PC, or your Raspberry Pi or your Android smart phone. It allows you to build an advanced system based on messaging. It is an excellent tool for creating high performance business messaging systems or to control robots or industrial equipment.
- Cluster feature is considered stable (ready for production).
- New feature: End to end encryption for file transfer in Chat client
- SMS Gateway feature is under major reconstruction (at this point it is unstable).
- Android and Linux software versions are available from this version.
- Chat feature is considered stable (ready for production).
- SMS Gateway feature is under major reconstruction (at this point it is unstable).
- Improvement in the delivery report handling of the SMPP service provider connection.
- Improvement in the HTTP Client service provider connection. It is possible to use TLS v1.2 from this version.
- Please note, that this release is still considered a preview. For production systems, at this point we still recommend you to use Ozeki NG SMS Gateway 4.15.0.
- This version provides a brand new user interface for the SMS gateway features. Although this interface looks similar to Ozeki NG SMS Gateway v4.15, it uses a component driven - state of the art - GUI engine to serve the content. To see this engine in action open the "Server load" page in the "View" menu of the SMS Gateway app. You will be amazed at the real time information updates and at the way the information is presented. This user interface uses AJAX over HTTPS and Secure websocket technology.
- This version also includes a HTTP API tester application, that allows our customers to perform a full test of our HTTP API. The install package contains the executable and the full .NET source code of this tester application. It is a very useful tool if you wish to test unicode character support through the HTTP API. It will allow you to verify our support of russian, chinese, japanese, hebrew and arabic characters. The HTTP API tester tool (and the source code) can be found in the following directory after installation: C:/Program Files/Ozeki/Ozeki10/ClientSoftware
- Please note, that this release is still considered a preview. For production systems, at this point we still recommend you to use Ozeki NG SMS Gateway 4.15.0.
- The stored data and all configuration files have been moved to a unified data directory to make it easier to do backup and restore.
- The HTTP API is improved.
- The Excel SMS client is updated to be compatible with the previous Ozeki NG SMS Gateway version, and the new port Ozeki 10 HTTP API
- Logfile management is improved
- Secure HTTP access (HTTPS) to the built in graphical user interface had an issue with the SSL Certificate. This problem is fixed.
- This release is considered a preview. For production systems, at this point we recommend you to use Ozeki NG SMS Gateway 4.15.0.
- We are proud to announce the first public release of Ozeki 10. This is our new, amazing SMS gateway software. It is the successor of Ozeki NG SMS Gateway. It has fantastic features, such as a built in peer to peer (P2P) chat system, which we believe is better then Skype. It allows communication with people and devices over the Internet using secure, high performance messaging.
- This release is considered a preview. For production systems, at this point we recommend you to use Ozeki NG SMS Gateway 4.15.0.
| Ozeki Camera Recorder |
Please fill in the following form and send it back to us in e-mail to info@ozeki.hu. Once we have received your payment, we will make
the ordered products available for immediate download. You will receive the detailed download instructions in e-mail. The seller is:
Company name: Ozeki Ltd.
Mailing address: 1-5. Nagy Lajos kiraly ter, Debrecen, Hungary, H-4032
E-mail address: info@ozeki.hu
| Contact person name: |
| Contact person e-mail: |
| Company name: |
| Company address: |
| Phone: |
| Ozeki Chat or Skype: |
II. Product
| Product edition | Product price | Quantity |
|
Ozeki Camera Recorder - 2 cameras To view and record 2 cameras simultaneously |
EUR 390,- | |
|
Ozeki Camera Recorder - 5 cameras To view and record 5 cameras simultaneously |
EUR 590,- | |
|
Ozeki Camera Recorder - 10 cameras To view and record 10 cameras simultaneously |
EUR 990,- | |
|
Ozeki Camera Recorder - 25 cameras To view and record 25 cameras simultaneously |
EUR 1 900,- | |
|
Ozeki Camera Recorder - 50 cameras To view and record 50 cameras simultaneously |
EUR 2 900,- | |
|
Ozeki Camera Recorder - 100 cameras To view and record 100 cameras simultaneously |
EUR 4 900,- | |
| Total | ||
| EUR | ||
III. Terms
The price of the products do not include CUSTOMS FEES, TAXES, OR VAT THAT MAY BE DUE. The customer is responsible for these charges.
| Date: | |||
| Signature | |||
Please fill in the following form and send it back to us in e-mail to info@ozeki.hu. Once we have received your payment, we will make
the ordered products available for immediate download. You will receive the detailed download instructions in e-mail. The seller is:
Company name: Ozeki Ltd.
Mailing address: 1-5. Nagy Lajos kiraly ter, Debrecen, Hungary, H-4032
E-mail address: info@ozeki.hu
| Contact person name: |
| Contact person e-mail: |
| Company name: |
| Company address: |
| Phone: |
| Ozeki Chat or Skype: |
II. Product
| Product edition | Product price | Quantity |
| Total | ||
| EUR | ||
III. Terms
The price of the products do not include CUSTOMS FEES, TAXES, OR VAT THAT MAY BE DUE. The customer is responsible for these charges.
| Date: | |||
| Signature | |||